Tell Liftosaur what bar, plates and fixed weights you have, and it rounds every target weight to what you can load. Keep a separate equipment list for each gym.
Why a weight is crossed out
Your program asks for 60% of a 135 lb 1RM, which is 81 lb. So the set shows 81 lb crossed out, and 80 lb underlined next to it.
Tap the underlined weight. The Why is the weight adjusted? popup shows the percentage and the 1RM, any kg to lb conversion, the bar weight, and the plates per side.
The rule for each kind of equipment:
Bar and plates: the bar plus the heaviest plate combination that does not go over the target. 45 lb bar + 10 + 5 + 2.5 per side is 80 lb.
Fixed weights: the heaviest fixed weight that does not go over the target, or the lightest one if all are heavier.
No equipment: the nearest multiple of the exercise's Default Rounding, 5 lb or 2.5 kg unless you change it.
Rounding happens on the workout screen only. Program state variables stay exact. With Premium, the expanded set also lists the plates for each side.
Where your equipment lives
Go to Me → Available Equipment. Each row is one piece of equipment with a summary, like Bar: 45 lb · 45 lb×8, 25 lb×4. Tap the arrow to expand it.
You start with Barbell, Trap Bar, Leverage Machine, Smith Machine, Dumbbell, EZ Bar, Cable and Kettlebell.
Set the bar, plates and sides
Expand a row to edit it:
Bar is the weight of the empty bar or machine.
Sides is how many sides take plates, 1 to 4. A barbell has 2. A machine with one peg has 1.
Number of Barbell plates available lists each plate weight and how many you own in total. A plate only counts when you have one for every side, so 3 plates of 45 lb count as 2 on a barbell.
Add New Plate Weight asks for a weight and adds it with a count of 2. The trash icon on a plate row removes that weight.
Fixed weights
Dumbbells, kettlebells and weight stacks come in fixed steps. Turn on Is Fixed Weight for that row. The plate fields go away, and Available fixed weight for Kettlebell lists one line per weight. Add New Fixed Weight adds one, the trash icon removes one.
lb or kg per equipment
Every row has a Unit field: Default, lb or kg. Pick kg for a machine with a kg stack in a lb gym. Exercises on that equipment show kg in the workout and in history. Graphs stay in your default unit.
Bodyweight, weighted and assisted pull-ups
Two switches on each plate-loaded row cover pull-ups, dips and the like. Bodyweight for Bar uses your current bodyweight as the bar, and the Bar field turns gray to show it. Is assisting? makes the plates reduce the total instead of adding to it. Your bodyweight comes from Me → Measurements, and from Apple Health or Health Connect when that sync is on.
Weighted pull-ups. Add a custom equipment, for example Belt, turn on Bodyweight for Bar, leave Is assisting? off, and enter the plates you hang from the belt. In the program, the weight is the extra load, and an update script adds your bodyweight when the workout starts:
The sets show bodyweight plus 25 lb, the plates calculator shows what to hang, and a good session makes it 30 lb next time.
Assisted pull-ups. Use the assisted machine equipment, or a custom one, turn on both Bodyweight for Bar and Is assisting?, and enter the machine's stack as plates. For bands, add one "plate" per band with the weight it takes off. In the program, the weight is the assistance, and the script subtracts it:
A good session lowers the assistance to 45 lb. If a weight drops to 0 by surprise, the Why is the weight adjusted? popup says when Is assisting? is the reason.
Plain bodyweight. Write 0lb and keep the update script, so the sets show your bodyweight and the history records it. See Progressions for update scripts and the bodyweight variable.
Hide equipment you do not have
Tap the eye icon on a built-in row to hide it. Hidden rows collect in one line at the bottom, Hidden Equipment: Smith Machine. Tap the name there to bring it back.
By default the exercise picker leaves out every exercise that uses hidden equipment, so a gym without a Smith machine never offers Smith machine exercises. To see them anyway, open the filter screen in the picker and turn off Show only available equipment. The switch is remembered until you change it back.
Add your own equipment
Tap Add New Equipment Type, enter a name and tap Add. The new row starts with a 0 lb bar and four 10 lb plates. Expand it to rename it and set its plates. The trash icon deletes it after Are you sure?.
Attach equipment to an exercise
Each exercise uses its built-in equipment unless you change it. Bench Press uses the Barbell.
During a workout, tap the Equipment: link under the exercise name. The popup lists None and every visible piece of equipment in the current gym. With None, it shows the Default Rounding field instead.
The same settings live in Me → Exercises. Tap an exercise to open its stats page. Default Rounding applies when no equipment is set. Below it is one equipment field per gym, under Equipments for each Gym.
Program scripts can step by your plates too:
weights[1] = increment(completedWeights[1]);
increment and decrement return the next or previous weight you can load with the exercise's equipment. See Liftoscript for the rest.
More than one gym
Tap Manage Gyms at the top of the equipment screen, then Add Gym. Name it and tap Add. The new gym gets the default equipment list.
On the Gyms screen, the pencil opens that gym's equipment, with a Gym Name field on top. The copy icon duplicates the gym with its equipment. The trash deletes it, and only shows with more than one gym.
Switch gyms
With two or more gyms, Me gets a Current Gym field. Pick a gym there, and every exercise switches to the equipment you attached for that gym. Available Equipment now opens the Gyms screen first.
A travel gym needs no setup. Leave its exercises on None, and the app rounds to Default Rounding until you are back.
{"feature":{"id":"equipment-and-gyms","title":"Equipment, Plates and Gyms","shortDescription":"Tell Liftosaur what bar, plates and fixed weights you have, and it rounds every target weight to what you can load. Keep a separate equipment list for each gym.","order":30,"category":"Exercises and equipment","datePublished":"2026-09-27","dateModified":"2026-09-29","screenshots":["equipment-and-gyms-barbell","equipment-and-gyms-gyms"]},"content":"## Why a weight is crossed out\n\nYour program asks for `60%` of a 135 lb 1RM, which is 81 lb. So the set shows 81 lb crossed out, and 80 lb underlined next to it.\n\nTap the underlined weight. The **Why is the weight adjusted?** popup shows the percentage and the 1RM, any kg to lb conversion, the bar weight, and the plates per side.\n\nThe rule for each kind of equipment:\n\n- Bar and plates: the bar plus the heaviest plate combination that does not go over the target. 45 lb bar + 10 + 5 + 2.5 per side is 80 lb.\n- Fixed weights: the heaviest fixed weight that does not go over the target, or the lightest one if all are heavier.\n- No equipment: the nearest multiple of the exercise's **Default Rounding**, 5 lb or 2.5 kg unless you change it.\n\nRounding happens on the workout screen only. Program state variables stay exact. With Premium, the expanded set also lists the plates for each side.\n\n## Where your equipment lives\n\n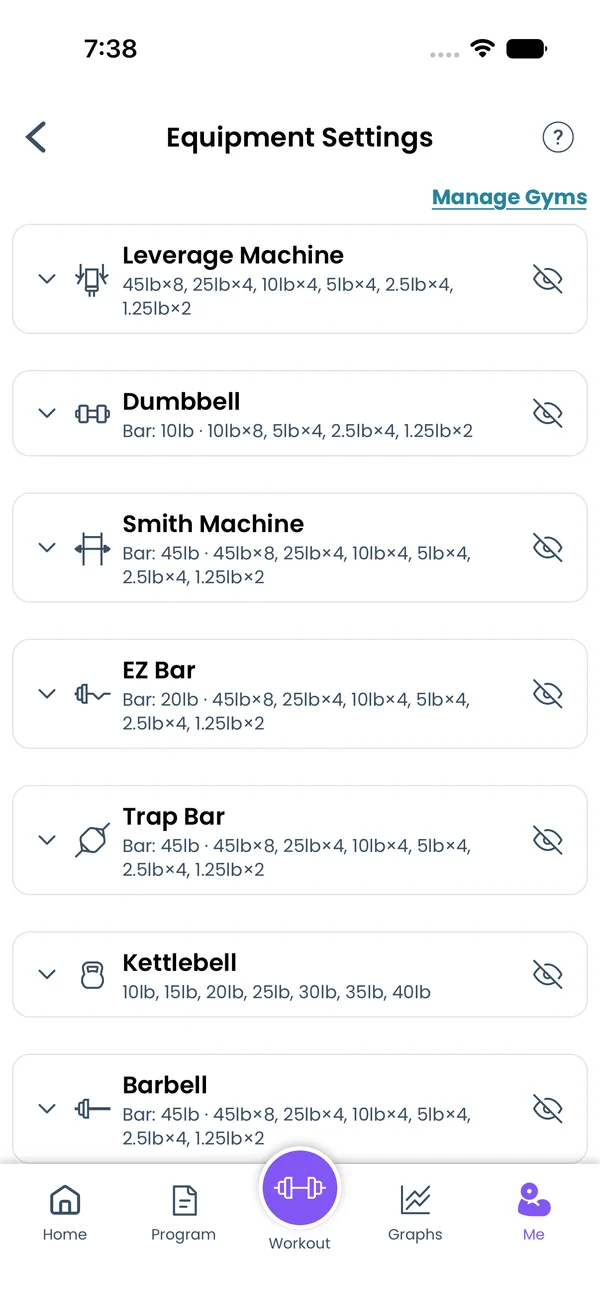\n\nGo to **Me → Available Equipment**. Each row is one piece of equipment with a summary, like `Bar: 45 lb · 45 lb×8, 25 lb×4`. Tap the arrow to expand it.\n\nYou start with **Barbell**, **Trap Bar**, **Leverage Machine**, **Smith Machine**, **Dumbbell**, **EZ Bar**, **Cable** and **Kettlebell**.\n\n## Set the bar, plates and sides\n\n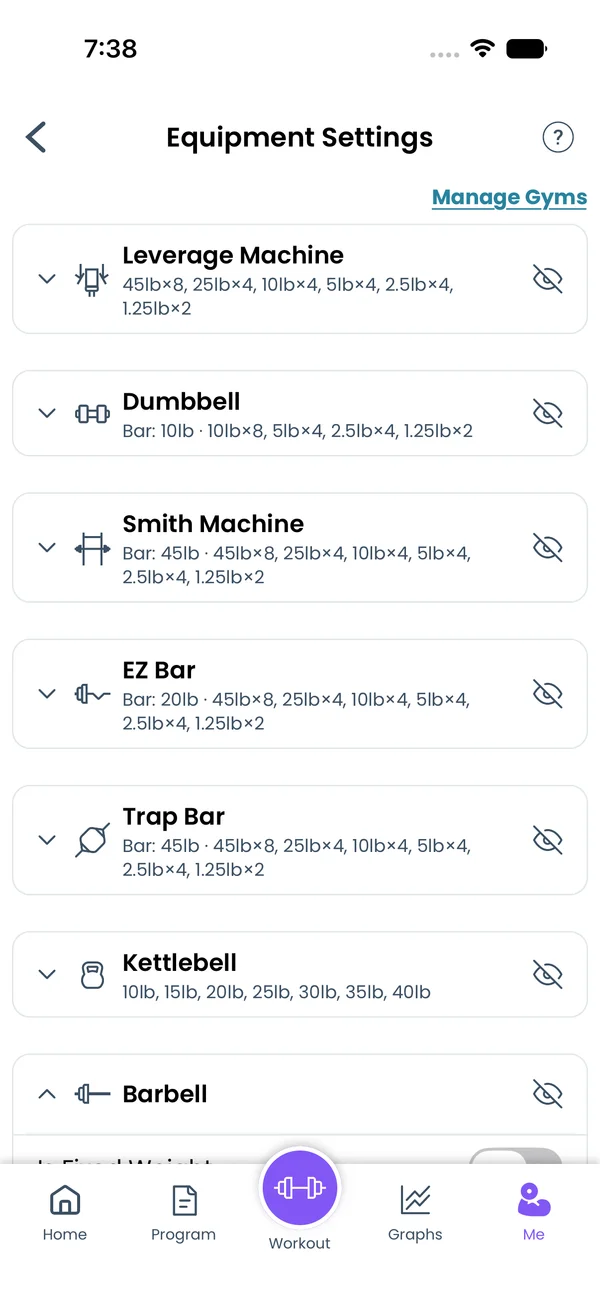\n\nExpand a row to edit it:\n\n- **Bar** is the weight of the empty bar or machine.\n- **Sides** is how many sides take plates, 1 to 4. A barbell has 2. A machine with one peg has 1.\n- **Number of Barbell plates available** lists each plate weight and how many you own in total. A plate only counts when you have one for every side, so 3 plates of 45 lb count as 2 on a barbell.\n- **Add New Plate Weight** asks for a weight and adds it with a count of 2. The trash icon on a plate row removes that weight.\n\n## Fixed weights\n\n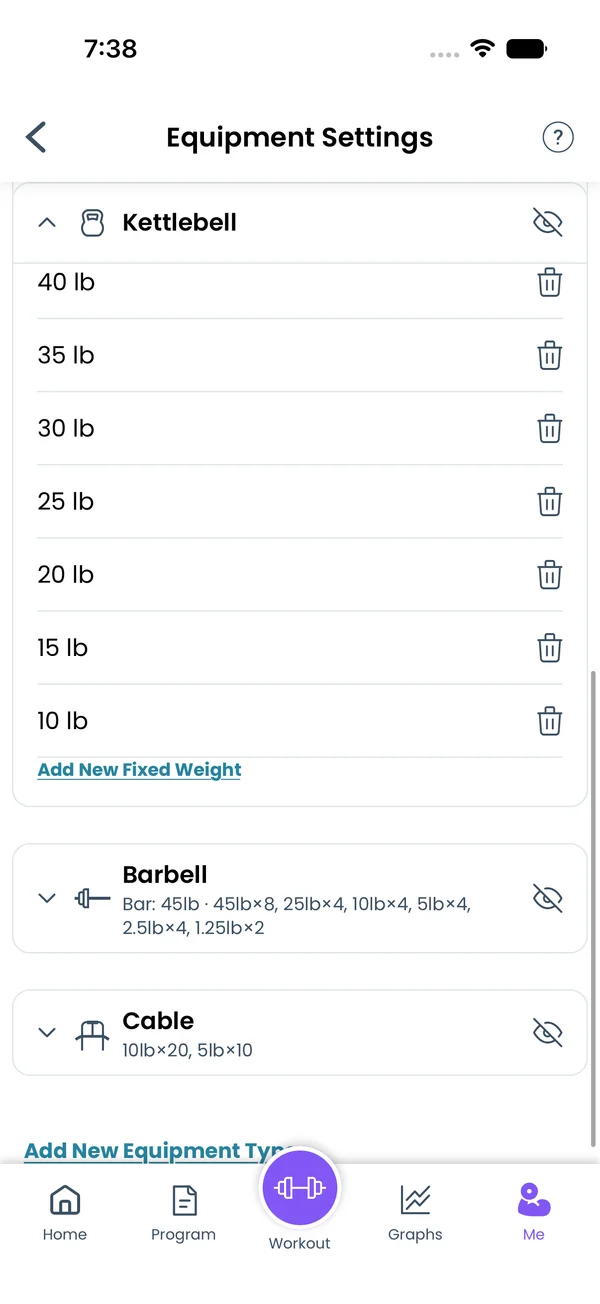\n\nDumbbells, kettlebells and weight stacks come in fixed steps. Turn on **Is Fixed Weight** for that row. The plate fields go away, and **Available fixed weight for Kettlebell** lists one line per weight. **Add New Fixed Weight** adds one, the trash icon removes one.\n\n## lb or kg per equipment\n\nEvery row has a **Unit** field: **Default**, **lb** or **kg**. Pick **kg** for a machine with a kg stack in a lb gym. Exercises on that equipment show kg in the workout and in history. Graphs stay in your default unit.\n\n## Bodyweight, weighted and assisted pull-ups\n\nTwo switches on each plate-loaded row cover pull-ups, dips and the like. **Bodyweight for Bar** uses your current bodyweight as the bar, and the **Bar** field turns gray to show it. **Is assisting?** makes the plates reduce the total instead of adding to it. Your bodyweight comes from **Me → Measurements**, and from Apple Health or Health Connect when that sync is on.\n\n**Weighted pull-ups.** Add a custom equipment, for example **Belt**, turn on **Bodyweight for Bar**, leave **Is assisting?** off, and enter the plates you hang from the belt. In the program, the weight is the extra load, and an `update` script adds your bodyweight when the workout starts:\n\n```liftoscript\nPull Up, Belt / 3x8 25lb / update: custom() {~\n if (setIndex == 0) {\n weights = bodyweight + originalWeights[ns]\n }\n~} / progress: lp(5lb)\n```\n\nThe sets show bodyweight plus 25 lb, the plates calculator shows what to hang, and a good session makes it 30 lb next time.\n\n**Assisted pull-ups.** Use the assisted machine equipment, or a custom one, turn on both **Bodyweight for Bar** and **Is assisting?**, and enter the machine's stack as plates. For bands, add one \"plate\" per band with the weight it takes off. In the program, the weight is the assistance, and the script subtracts it:\n\n```liftoscript\nPull Up, Leverage Machine / 3x8 50lb / update: custom() {~\n if (setIndex == 0) {\n weights = bodyweight - originalWeights[ns]\n }\n~} / progress: lp(-5lb)\n```\n\nA good session lowers the assistance to 45 lb. If a weight drops to 0 by surprise, the **Why is the weight adjusted?** popup says when **Is assisting?** is the reason.\n\n**Plain bodyweight.** Write `0lb` and keep the `update` script, so the sets show your bodyweight and the history records it. See [Progressions](/features/progressions) for `update` scripts and the `bodyweight` variable.\n\n## Hide equipment you do not have\n\n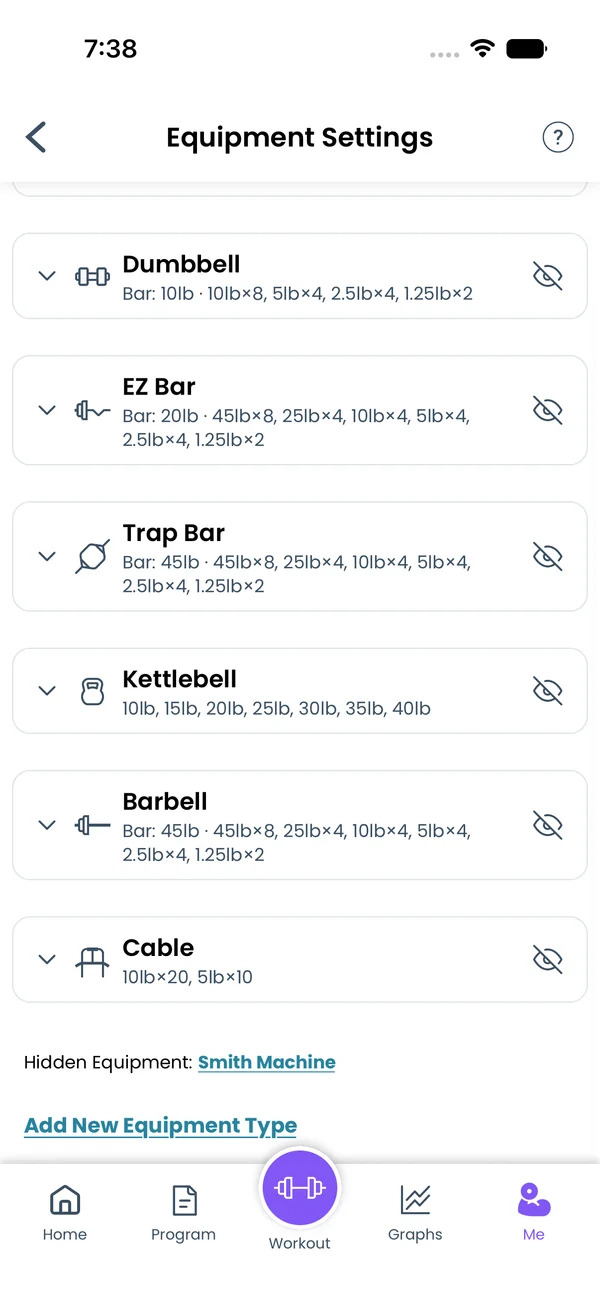\n\nTap the eye icon on a built-in row to hide it. Hidden rows collect in one line at the bottom, **Hidden Equipment: Smith Machine**. Tap the name there to bring it back.\n\nBy default the exercise picker leaves out every exercise that uses hidden equipment, so a gym without a Smith machine never offers Smith machine exercises. To see them anyway, open the filter screen in the picker and turn off **Show only available equipment**. The switch is remembered until you change it back.\n\n## Add your own equipment\n\n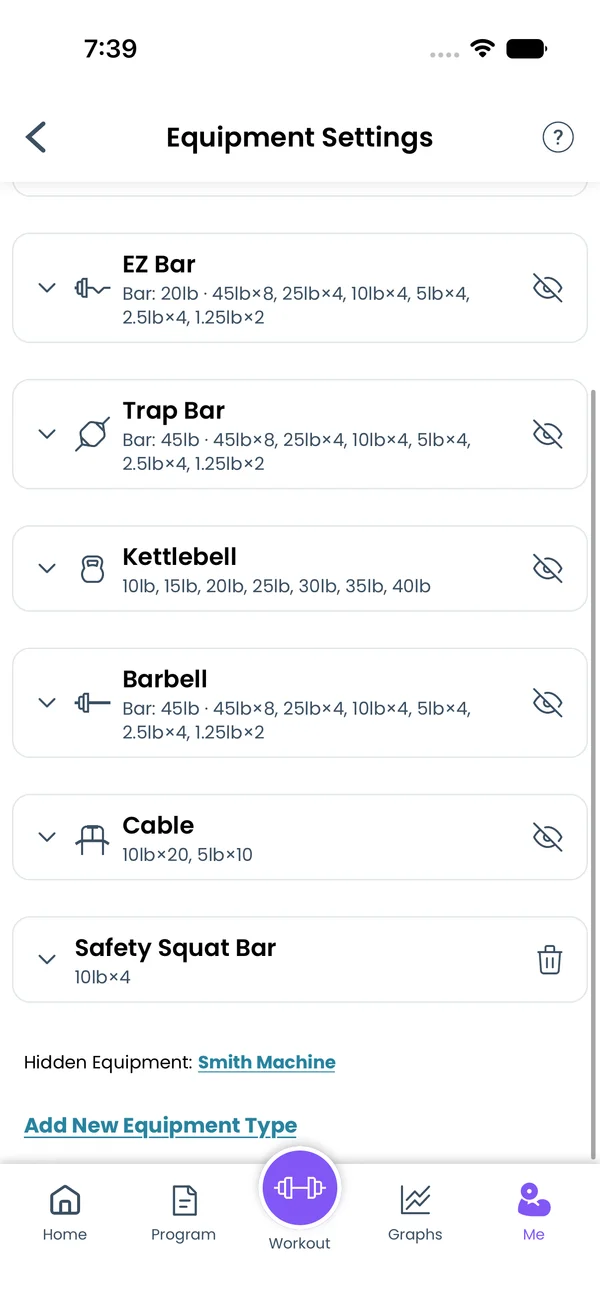\n\nTap **Add New Equipment Type**, enter a name and tap **Add**. The new row starts with a 0 lb bar and four 10 lb plates. Expand it to rename it and set its plates. The trash icon deletes it after **Are you sure?**.\n\n## Attach equipment to an exercise\n\n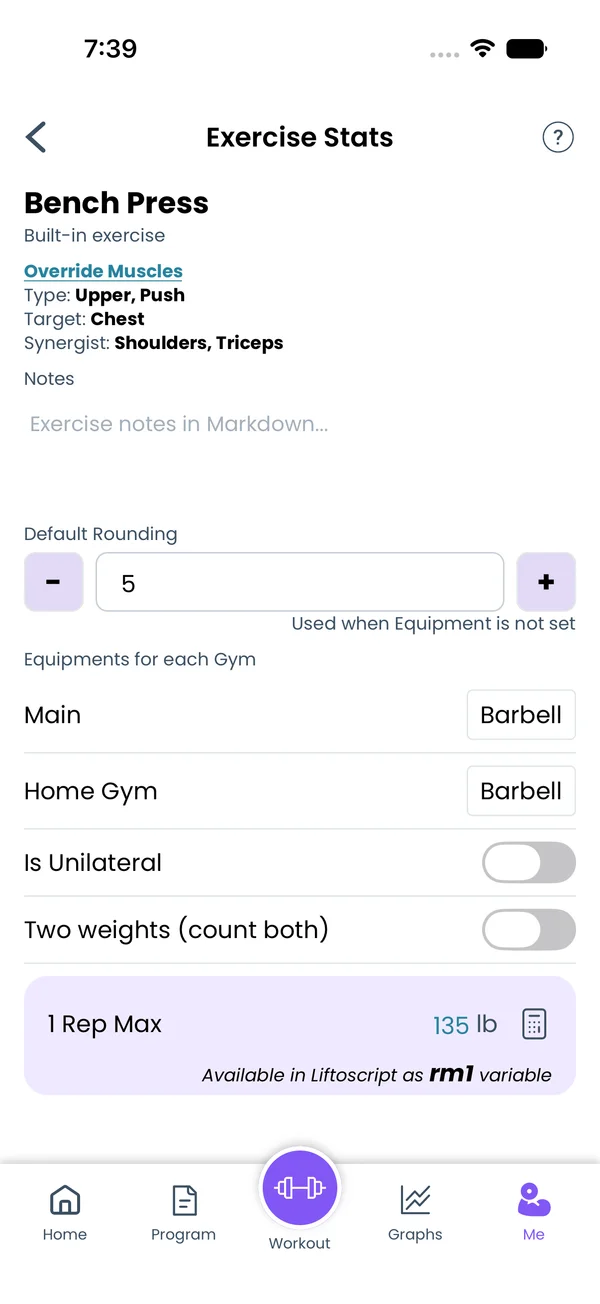\n\nEach exercise uses its built-in equipment unless you change it. Bench Press uses the Barbell.\n\nDuring a workout, tap the **Equipment:** link under the exercise name. The popup lists **None** and every visible piece of equipment in the current gym. With **None**, it shows the **Default Rounding** field instead.\n\nThe same settings live in **Me → Exercises**. Tap an exercise to open its stats page. **Default Rounding** applies when no equipment is set. Below it is one equipment field per gym, under **Equipments for each Gym**.\n\nProgram scripts can step by your plates too:\n\n```liftoscript\nweights[1] = increment(completedWeights[1]);\n```\n\n`increment` and `decrement` return the next or previous weight you can load with the exercise's equipment. See [Liftoscript](/doc/liftoscript) for the rest.\n\n## More than one gym\n\n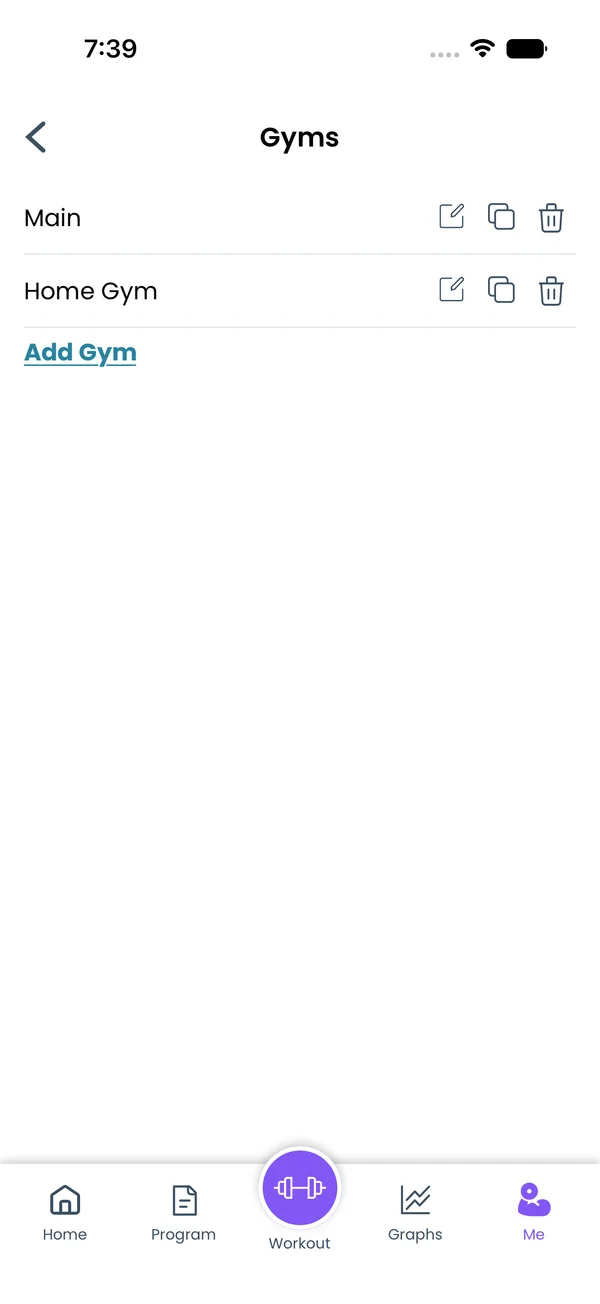\n\nTap **Manage Gyms** at the top of the equipment screen, then **Add Gym**. Name it and tap **Add**. The new gym gets the default equipment list.\n\nOn the **Gyms** screen, the pencil opens that gym's equipment, with a **Gym Name** field on top. The copy icon duplicates the gym with its equipment. The trash deletes it, and only shows with more than one gym.\n\n## Switch gyms\n\nWith two or more gyms, **Me** gets a **Current Gym** field. Pick a gym there, and every exercise switches to the equipment you attached for that gym. **Available Equipment** now opens the **Gyms** screen first.\n\nA travel gym needs no setup. Leave its exercises on **None**, and the app rounds to **Default Rounding** until you are back.","sizes":{"account/account-email-form":{"width":600,"height":1304},"account/account-forgot-password":{"width":600,"height":1304},"account/account-screen":{"width":600,"height":1304},"account/account-sign-in":{"width":600,"height":1304},"chatgpt-claude-and-ai/chatgpt-claude-and-ai-autofill":{"width":600,"height":1304},"api/api-key-created":{"width":600,"height":1304},"api/api-keys-empty":{"width":600,"height":1304},"api/api-me-row":{"width":600,"height":1304},"apple-watch/apple-watch-health-settings":{"width":600,"height":1304},"apple-watch/watch-apple-watch-amrap":{"width":416,"height":496},"apple-watch/watch-apple-watch-crown":{"width":416,"height":496},"apple-watch/watch-apple-watch-exercise":{"width":416,"height":496},"apple-watch/watch-apple-watch-get-ready":{"width":416,"height":496},"apple-watch/watch-apple-watch-home":{"width":416,"height":496},"apple-watch/watch-apple-watch-set-clock":{"width":416,"height":496},"apple-watch/watch-apple-watch-workout":{"width":416,"height":496},"built-in-programs/built-in-programs-import":{"width":600,"height":1304},"built-in-programs/built-in-programs-info":{"width":600,"height":1304},"built-in-programs/built-in-programs-library":{"width":600,"height":1304},"built-in-programs/built-in-programs-preview":{"width":600,"height":1304},"built-in-programs/built-in-programs-started":{"width":600,"height":1304},"changing-a-workout/changing-a-workout-adhoc":{"width":600,"height":1304},"changing-a-workout/changing-a-workout-adhoc-picker":{"width":600,"height":1304},"changing-a-workout/changing-a-workout-create-program-day":{"width":600,"height":1304},"changing-a-workout/changing-a-workout-edit-day":{"width":600,"height":1304},"changing-a-workout/changing-a-workout-edit-exercise":{"width":600,"height":1304},"changing-a-workout/changing-a-workout-next-workout":{"width":600,"height":1304},"changing-a-workout/changing-a-workout-pick-day":{"width":600,"height":1304},"changing-a-workout/changing-a-workout-program-day":{"width":600,"height":1304},"changing-a-workout/changing-a-workout-swap-adhoc":{"width":600,"height":1304},"changing-a-workout/changing-a-workout-swap-from-program":{"width":600,"height":1304},"changing-a-workout/changing-a-workout-swap-recent":{"width":600,"height":1304},"custom-exercises/custom-exercises-autofill":{"width":600,"height":1304},"custom-exercises/custom-exercises-clone-library":{"width":600,"height":1304},"custom-exercises/custom-exercises-cloned":{"width":600,"height":1304},"custom-exercises/custom-exercises-form":{"width":600,"height":1304},"custom-exercises/custom-exercises-hidden-group":{"width":600,"height":1304},"custom-exercises/custom-exercises-image-library":{"width":600,"height":1304},"custom-exercises/custom-exercises-image-source":{"width":600,"height":1304},"custom-exercises/custom-exercises-in-workout":{"width":600,"height":1304},"custom-exercises/custom-exercises-muscle-groups":{"width":600,"height":1304},"custom-exercises/custom-exercises-picker":{"width":600,"height":1304},"custom-exercises/custom-exercises-target-muscles":{"width":600,"height":1304},"equipment-and-gyms/equipment-and-gyms-barbell":{"width":600,"height":1304},"equipment-and-gyms/equipment-and-gyms-custom":{"width":600,"height":1304},"equipment-and-gyms/equipment-and-gyms-exercise":{"width":600,"height":1304},"equipment-and-gyms/equipment-and-gyms-fixed":{"width":600,"height":1304},"equipment-and-gyms/equipment-and-gyms-gyms":{"width":600,"height":1304},"equipment-and-gyms/equipment-and-gyms-hidden":{"width":600,"height":1304},"equipment-and-gyms/equipment-and-gyms-list":{"width":600,"height":1304},"exercise-library/exercise-library-calculator":{"width":600,"height":1304},"exercise-library/exercise-library-from-program":{"width":600,"height":1304},"exercise-library/exercise-library-list":{"width":600,"height":1304},"exercise-library/exercise-library-multi-add":{"width":600,"height":1304},"exercise-library/exercise-library-override-muscles":{"width":600,"height":1304},"exercise-library/exercise-library-picker":{"width":600,"height":1304},"exercise-library/exercise-library-prs":{"width":600,"height":1304},"exercise-library/exercise-library-search":{"width":600,"height":1304},"exercise-library/exercise-library-stats":{"width":600,"height":1304},"exercise-library/exercise-library-swap":{"width":600,"height":1304},"graphs/graphs-bodyweight":{"width":600,"height":1304},"graphs/graphs-choose":{"width":600,"height":1304},"graphs/graphs-exercise":{"width":600,"height":1304},"graphs/graphs-legend":{"width":600,"height":1304},"graphs/graphs-muscle-group":{"width":600,"height":1304},"graphs/graphs-personal-records":{"width":600,"height":1304},"graphs/graphs-settings":{"width":600,"height":1304},"health-sync/android-health-sync-measurements":{"width":600,"height":1339},"health-sync/android-health-sync-settings":{"width":600,"height":1339},"health-sync/android-health-sync-share":{"width":600,"height":1339},"health-sync/android-health-sync-sleep-nutrition":{"width":600,"height":1339},"health-sync/health-sync-measurements":{"width":600,"height":1304},"health-sync/health-sync-settings":{"width":600,"height":1304},"health-sync/health-sync-share":{"width":600,"height":1304},"health-sync/health-sync-sleep-nutrition":{"width":600,"height":1304},"import-export/import-export-export":{"width":600,"height":1304},"import-export/import-export-hevy":{"width":600,"height":1304},"import-export/import-export-import":{"width":600,"height":1304},"liftoscript/liftoscript-exercise-sheet":{"width":600,"height":1304},"liftoscript/liftoscript-full-program":{"width":600,"height":1304},"liftoscript/liftoscript-per-day":{"width":600,"height":1304},"liftoscript/liftoscript-playground":{"width":600,"height":1304},"lock-screen-and-notifications/android-lock-screen-and-notifications-live-update":{"width":600,"height":1339},"lock-screen-and-notifications/android-lock-screen-and-notifications-reminder":{"width":600,"height":1339},"lock-screen-and-notifications/android-lock-screen-and-notifications-sound":{"width":600,"height":1339},"lock-screen-and-notifications/lock-screen-and-notifications-dynamic-island":{"width":600,"height":1304},"lock-screen-and-notifications/lock-screen-and-notifications-live-activity":{"width":600,"height":1304},"lock-screen-and-notifications/lock-screen-and-notifications-reminder":{"width":600,"height":1304},"lock-screen-and-notifications/lock-screen-and-notifications-sound":{"width":600,"height":1304},"measurements/measurements-add":{"width":600,"height":1304},"measurements/measurements-bodyweight":{"width":600,"height":1304},"measurements/measurements-moving-average":{"width":600,"height":1304},"measurements/measurements-sleep-nutrition":{"width":600,"height":1304},"measurements/measurements-types":{"width":600,"height":1304},"first-run-and-settings/first-run-and-settings-appearance":{"width":600,"height":1304},"first-run-and-settings/first-run-and-settings-dark-mode":{"width":600,"height":1304},"first-run-and-settings/first-run-and-settings-equipment":{"width":600,"height":1304},"first-run-and-settings/first-run-and-settings-me":{"width":600,"height":1304},"first-run-and-settings/first-run-and-settings-units":{"width":600,"height":1304},"first-run-and-settings/first-run-and-settings-welcome":{"width":600,"height":1304},"playground/playground-completed":{"width":600,"height":1304},"playground/playground-day":{"width":600,"height":1304},"playground/playground-finished":{"width":600,"height":1304},"playground/playground-variables":{"width":600,"height":1304},"premium/premium-account":{"width":600,"height":1304},"premium/premium-feature-info":{"width":600,"height":1304},"premium/premium-plans":{"width":600,"height":1304},"program-editor/program-editor-create":{"width":600,"height":1304},"program-editor/program-editor-day-details":{"width":600,"height":1304},"program-editor/program-editor-exercise-sheet":{"width":600,"height":1304},"program-editor/program-editor-full-text":{"width":600,"height":1304},"program-editor/program-editor-grid":{"width":600,"height":1304},"program-editor/program-editor-perday-text":{"width":600,"height":1304},"program-editor/program-editor-ui-mode":{"width":600,"height":1304},"program-editor/program-editor-week-stats":{"width":600,"height":1304},"progressions/progressions-linear-settings":{"width":600,"height":1304},"progressions/progressions-preview":{"width":600,"height":1304},"progressions/progressions-state-variables":{"width":600,"height":1304},"progressions/progressions-suppressed":{"width":600,"height":1304},"rest-timer/rest-timer-collapsed":{"width":600,"height":1304},"rest-timer/rest-timer-dynamic-island":{"width":600,"height":1304},"rest-timer/rest-timer-expanded":{"width":600,"height":1304},"rest-timer/rest-timer-get-ready":{"width":600,"height":1304},"rest-timer/rest-timer-lock-screen":{"width":600,"height":1304},"rest-timer/rest-timer-settings":{"width":600,"height":1304},"rest-timer/rest-timer-sound":{"width":600,"height":1304},"rest-timer/watch-rest-timer":{"width":416,"height":496},"rest-timer/watch-rest-timer-exercise":{"width":416,"height":496},"set-types/set-types-amrap-popup":{"width":600,"height":1304},"set-types/set-types-per-side":{"width":600,"height":1304},"set-types/set-types-rpe-logged":{"width":600,"height":1304},"set-types/set-types-rpe-popup":{"width":600,"height":1304},"sharing-programs/sharing-programs-export-text":{"width":600,"height":1304},"sharing-programs/sharing-programs-image-preview":{"width":600,"height":1304},"sharing-programs/sharing-programs-image-settings":{"width":600,"height":1304},"sharing-programs/sharing-programs-import":{"width":600,"height":1304},"sharing-programs/sharing-programs-menu":{"width":600,"height":1304},"sharing-programs/sharing-programs-private-link":{"width":600,"height":1304},"sharing-programs/sharing-programs-public-link":{"width":600,"height":1304},"sharing-workouts/sharing-workouts-copied-text":{"width":600,"height":1304},"sharing-workouts/sharing-workouts-finish-screen":{"width":600,"height":1304},"sharing-workouts/sharing-workouts-profile-settings":{"width":600,"height":1304},"sharing-workouts/sharing-workouts-share-sheet":{"width":600,"height":1304},"sharing-workouts/sharing-workouts-story-preview":{"width":600,"height":1304},"supersets/supersets-liftoscript":{"width":600,"height":1304},"supersets/supersets-next-exercise":{"width":600,"height":1304},"supersets/supersets-picker":{"width":600,"height":1304},"supersets/supersets-program-editor":{"width":600,"height":1304},"supersets/supersets-timer":{"width":600,"height":1304},"supersets/supersets-workout":{"width":600,"height":1304},"sync-and-offline/sync-and-offline-account":{"width":600,"height":1304},"sync-and-offline/sync-and-offline-me-account":{"width":600,"height":1304},"sync-and-offline/sync-and-offline-sign-in":{"width":600,"height":1304},"timed-sets/timed-sets-count-up":{"width":600,"height":1304},"timed-sets/timed-sets-edit-time":{"width":600,"height":1304},"timed-sets/timed-sets-get-ready":{"width":600,"height":1304},"timed-sets/timed-sets-recorded":{"width":600,"height":1304},"timed-sets/timed-sets-running":{"width":600,"height":1304},"timed-sets/timed-sets-set-row":{"width":600,"height":1304},"timed-sets/timed-sets-timers":{"width":600,"height":1304},"week-insights/week-insights-details":{"width":600,"height":1304},"week-insights/week-insights-edit-muscle-groups":{"width":600,"height":1304},"week-insights/week-insights-exercises":{"width":600,"height":1304},"week-insights/week-insights-home":{"width":600,"height":1304},"week-insights/week-insights-muscle-groups":{"width":600,"height":1304},"week-insights/week-insights-settings":{"width":600,"height":1304},"workout-history/workout-history-change-date":{"width":600,"height":1304},"workout-history/workout-history-delete":{"width":600,"height":1304},"workout-history/workout-history-feed":{"width":600,"height":1304},"workout-history/workout-history-menu":{"width":600,"height":1304},"workout-history/workout-history-month-calendar":{"width":600,"height":1304},"workout-history/workout-history-note-on-card":{"width":600,"height":1304},"workout-history/workout-history-notes":{"width":600,"height":1304},"workout-history/workout-history-past-card":{"width":600,"height":1304},"workout-history/workout-history-past-workout":{"width":600,"height":1304},"workout-history/workout-history-week-insights":{"width":600,"height":1304},"workout-screen/workout-screen-e1rm":{"width":600,"height":1304},"workout-screen/workout-screen-edit-target":{"width":600,"height":1304},"workout-screen/workout-screen-exercise-menu":{"width":600,"height":1304},"workout-screen/workout-screen-exercise-notes":{"width":600,"height":1304},"workout-screen/workout-screen-history":{"width":600,"height":1304},"workout-screen/workout-screen-keypad":{"width":600,"height":1304},"workout-screen/workout-screen-next-set":{"width":600,"height":1304},"workout-screen/workout-screen-overview":{"width":600,"height":1304},"workout-screen/workout-screen-rounding":{"width":600,"height":1304},"workout-screen/workout-screen-summary":{"width":600,"height":1304}}}






