See max weight, volume and estimated 1RM per exercise, weekly volume per muscle group, and bodyweight. Long-press a point to see the workout behind it.
Where the graphs live
Tap Graphs in the footer. Graphs are a Premium feature. Without Premium, the tab opens the subscription screen instead.
The first time, the screen says "Select graphs you want to display by tapping filter icon at right top corner." Every graph you pick stays on this screen, in the order you set, until you remove it.
Each graph is a line chart with the date on the X axis.
Choosing which graphs to show
Tap the filter icon at the top right. A sheet opens with four groups:
Selected Graphs. The graphs on the screen. Drag the handle on the left to reorder. Tap the X on the right to remove.
Available Exercise Graphs. Every exercise in your history that is not on the screen yet. Tap one to add it.
Available Muscle Groups Graphs. One graph per muscle group, plus Total Weekly Volume.
Available Stats Graphs. Bodyweight and every length or body fat measurement you have logged.
If you have no history and no measurements, the sheet says "You haven't tracked any workouts or measurements yet."
Reading an exercise graph
The dropdown at the top right of each exercise graph switches between Max Weight and Volume.
Max Weight shows the heaviest set of that exercise in each workout. A second line shows the estimated one rep max (e1RM) of your best set that day: its weight divided by the share of 1RM that the RPE chart gives for its reps at its RPE, with RPE 10 assumed when none is logged. It is the same number as the e1RM column on the workout screen, see Logging a Workout.
Volume shows weight × reps summed over all sets in the workout.
Long-press a point. A legend appears above the chart with the date, the weight and reps, and the e1RM. It also shows the notes you wrote for that exercise or workout, and the state variables of the exercise on that day, like rm1 or increment. Tap Workout in the legend to open that workout. Tap the X to close the legend.
With Add program lines to graphs on, a vertical line marks each date you switched programs, labelled with the program name.
Zooming in
Pinch with two fingers to zoom the date range. Drag with two fingers to move the zoomed area. Double-tap the chart to reset the zoom.
Muscle group volume per week
A muscle group graph has one point per week. The dropdown switches between Volume and Sets.
Liftosaur counts only sets you finished. A set for a target muscle counts once. A set for a synergist muscle counts by the synergist multiplier from your settings. The Total graph counts every finished set once. The week starts on Monday or Sunday, following Week starts from in Me → Settings.
The built-in groups are shoulders, triceps, back, abs, glutes, hamstrings, quadriceps, chest, biceps, calves and forearms. Custom muscle groups get a graph too. To change which muscles an exercise trains, open the exercise from Me → Exercises and tap Override Muscles.
Bodyweight and measurements
Add Bodyweight from the Available Stats Graphs group. It plots every bodyweight entry you logged. Length measurements, like waist or chest, and body fat percentage each get their own graph in the same way.
Once the bodyweight graph is on the screen, a new toggle appears in settings: Add bodyweight to all graphs. It draws your bodyweight as a green line on every exercise graph, so you can see how your lifts moved with your weight.
Graph settings
The Settings group at the top of the picker sheet has:
Default exercise graph type. Weight or Volume. New exercise graphs open with this type.
Default muscle group graph type. Volume or Sets.
Same range for X axis for all graphs. Off by default. Each graph starts at its first date and ends at its last. On, every graph shares one date range, capped to the last year, so you can compare them.
Add bodyweight to all graphs. Shown once the bodyweight graph is selected.
Add calculated 1RM to graphs. On by default. Turns the e1RM line on the Max Weight graphs on or off.
Add program lines to graphs. Turns the program change lines on or off.
Personal records for one exercise
Every exercise also has its own Exercise Stats screen. Open it from Me → Exercises and tap the exercise, or tap the exercise name during a workout.
The screen shows the exercise graph with the e1RM line and program lines always on. Below the graph, the Personal Records card lists your Max Weight and Max 1RM, each with the date. The 1RM row also shows the set behind it, like 5 x 225lb. Tap a record to open that workout. The exercise history follows below.
Without Premium, the graph on this screen is blurred and does not respond to touch. The personal records stay visible.
{"feature":{"id":"graphs","title":"Graphs","shortDescription":"See max weight, volume and estimated 1RM per exercise, weekly volume per muscle group, and bodyweight. Long-press a point to see the workout behind it.","order":10,"category":"Progress","datePublished":"2026-09-27","dateModified":"2026-09-29","screenshots":["graphs-exercise","graphs-muscle-group"]},"content":"## Where the graphs live\n\n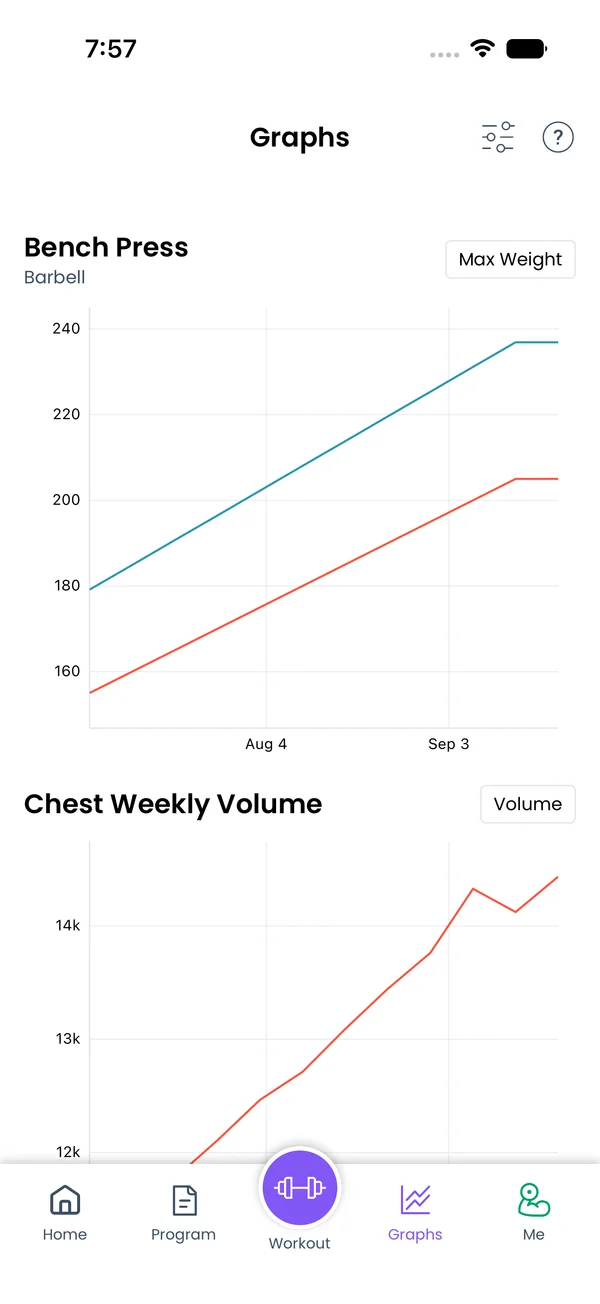\n\nTap **Graphs** in the footer. Graphs are a Premium feature. Without Premium, the tab opens the subscription screen instead.\n\nThe first time, the screen says \"Select graphs you want to display by tapping filter icon at right top corner.\" Every graph you pick stays on this screen, in the order you set, until you remove it.\n\nEach graph is a line chart with the date on the X axis.\n\n## Choosing which graphs to show\n\n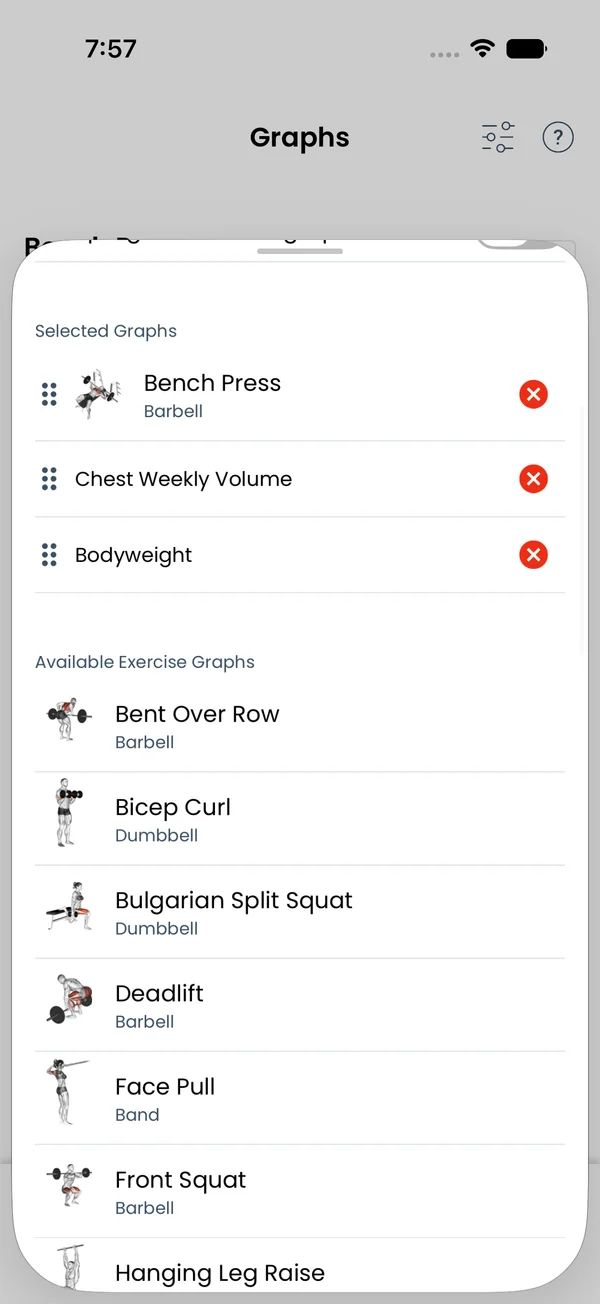\n\nTap the filter icon at the top right. A sheet opens with four groups:\n\n- **Selected Graphs**. The graphs on the screen. Drag the handle on the left to reorder. Tap the X on the right to remove.\n- **Available Exercise Graphs**. Every exercise in your history that is not on the screen yet. Tap one to add it.\n- **Available Muscle Groups Graphs**. One graph per muscle group, plus **Total Weekly Volume**.\n- **Available Stats Graphs**. **Bodyweight** and every length or body fat measurement you have logged.\n\nIf you have no history and no measurements, the sheet says \"You haven't tracked any workouts or measurements yet.\"\n\n## Reading an exercise graph\n\n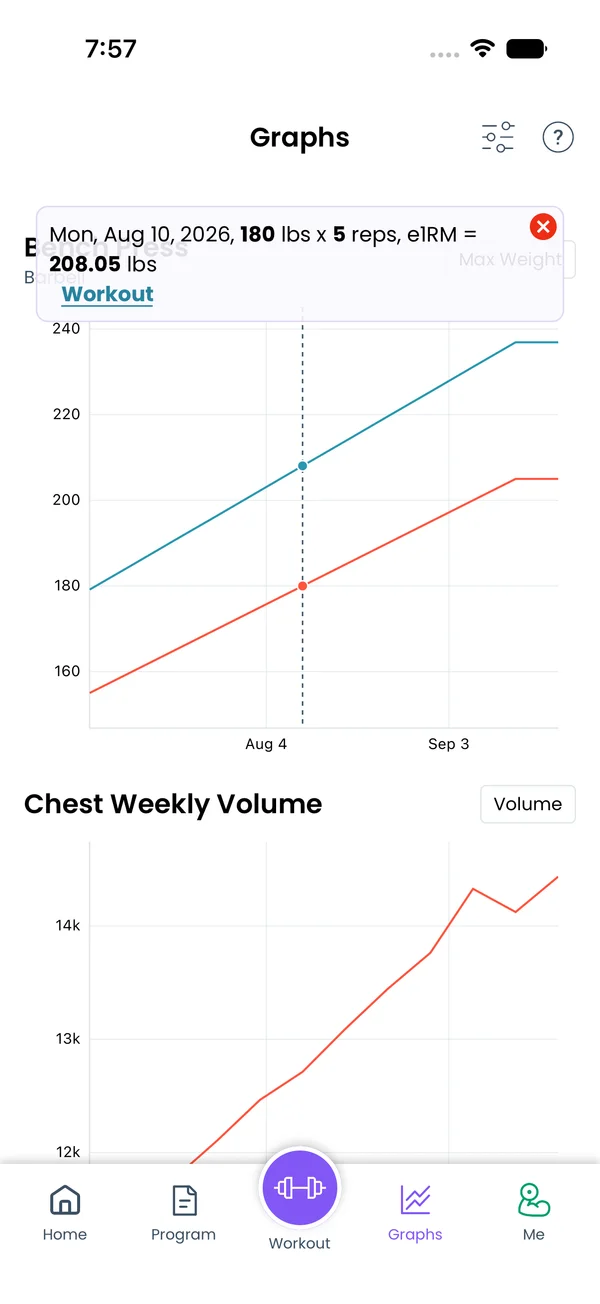\n\nThe dropdown at the top right of each exercise graph switches between **Max Weight** and **Volume**.\n\n- **Max Weight** shows the heaviest set of that exercise in each workout. A second line shows the estimated one rep max (e1RM) of your best set that day: its weight divided by the share of 1RM that the RPE chart gives for its reps at its RPE, with RPE 10 assumed when none is logged. It is the same number as the **e1RM** column on the workout screen, see [Logging a Workout](/features/workout-screen).\n- **Volume** shows weight × reps summed over all sets in the workout.\n\nLong-press a point. A legend appears above the chart with the date, the weight and reps, and the e1RM. It also shows the notes you wrote for that exercise or workout, and the state variables of the exercise on that day, like `rm1` or `increment`. Tap **Workout** in the legend to open that workout. Tap the X to close the legend.\n\nWith **Add program lines to graphs** on, a vertical line marks each date you switched programs, labelled with the program name.\n\n## Zooming in\n\nPinch with two fingers to zoom the date range. Drag with two fingers to move the zoomed area. Double-tap the chart to reset the zoom.\n\n## Muscle group volume per week\n\n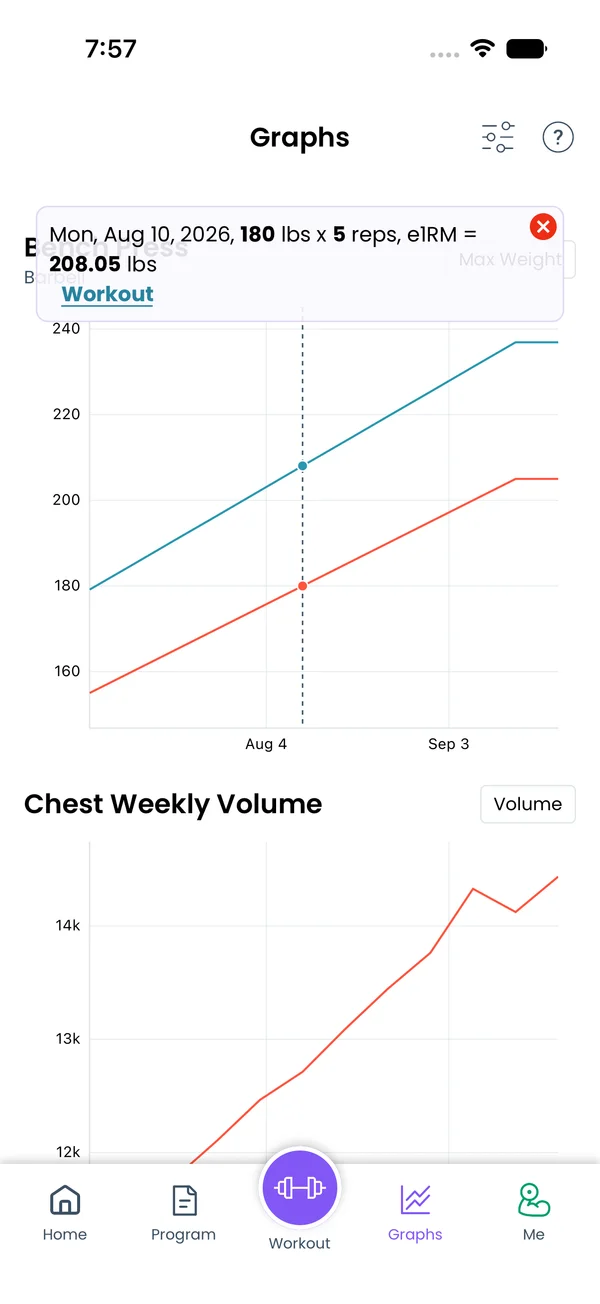\n\nA muscle group graph has one point per week. The dropdown switches between **Volume** and **Sets**.\n\nLiftosaur counts only sets you finished. A set for a target muscle counts once. A set for a synergist muscle counts by the synergist multiplier from your settings. The **Total** graph counts every finished set once. The week starts on Monday or Sunday, following **Week starts from** in **Me → Settings**.\n\nThe built-in groups are shoulders, triceps, back, abs, glutes, hamstrings, quadriceps, chest, biceps, calves and forearms. Custom muscle groups get a graph too. To change which muscles an exercise trains, open the exercise from **Me → Exercises** and tap **Override Muscles**.\n\n## Bodyweight and measurements\n\n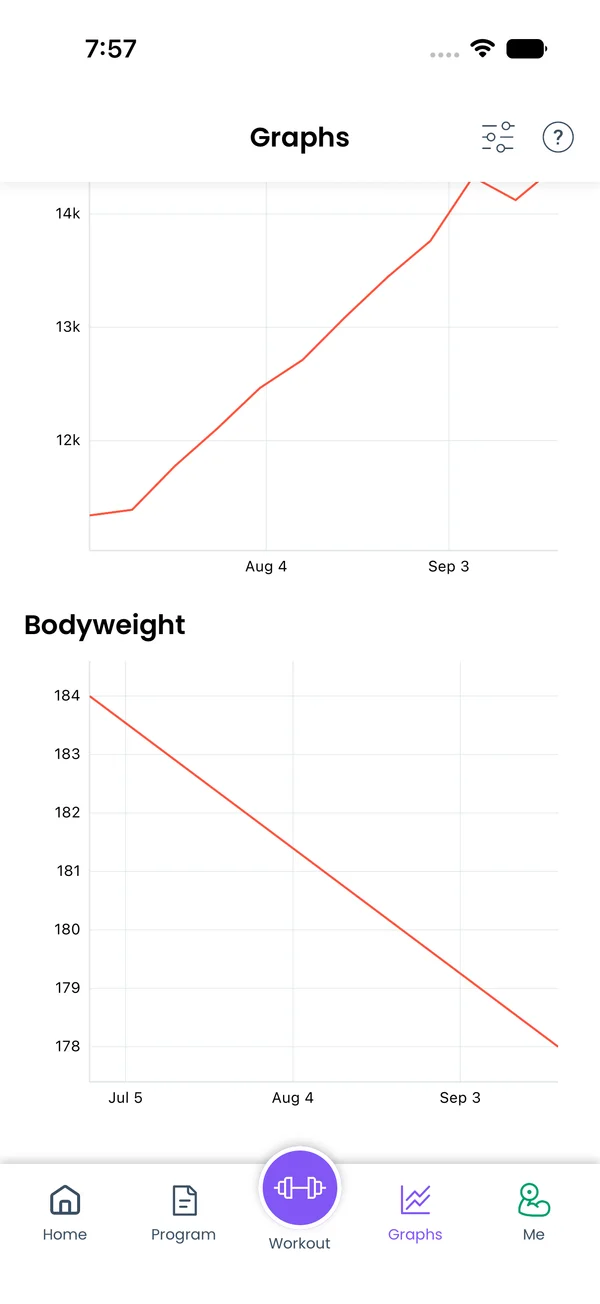\n\nAdd **Bodyweight** from the **Available Stats Graphs** group. It plots every bodyweight entry you logged. Length measurements, like waist or chest, and body fat percentage each get their own graph in the same way.\n\nOnce the bodyweight graph is on the screen, a new toggle appears in settings: **Add bodyweight to all graphs**. It draws your bodyweight as a green line on every exercise graph, so you can see how your lifts moved with your weight.\n\n## Graph settings\n\n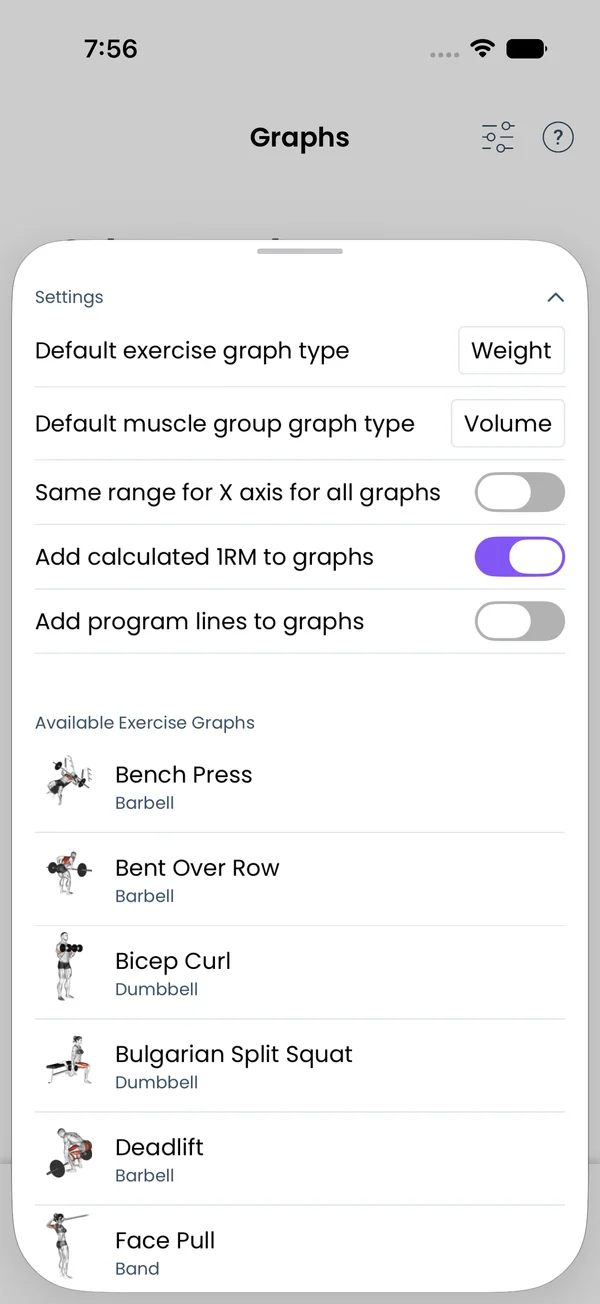\n\nThe **Settings** group at the top of the picker sheet has:\n\n- **Default exercise graph type**. **Weight** or **Volume**. New exercise graphs open with this type.\n- **Default muscle group graph type**. **Volume** or **Sets**.\n- **Same range for X axis for all graphs**. Off by default. Each graph starts at its first date and ends at its last. On, every graph shares one date range, capped to the last year, so you can compare them.\n- **Add bodyweight to all graphs**. Shown once the bodyweight graph is selected.\n- **Add calculated 1RM to graphs**. On by default. Turns the e1RM line on the Max Weight graphs on or off.\n- **Add program lines to graphs**. Turns the program change lines on or off.\n\n## Personal records for one exercise\n\n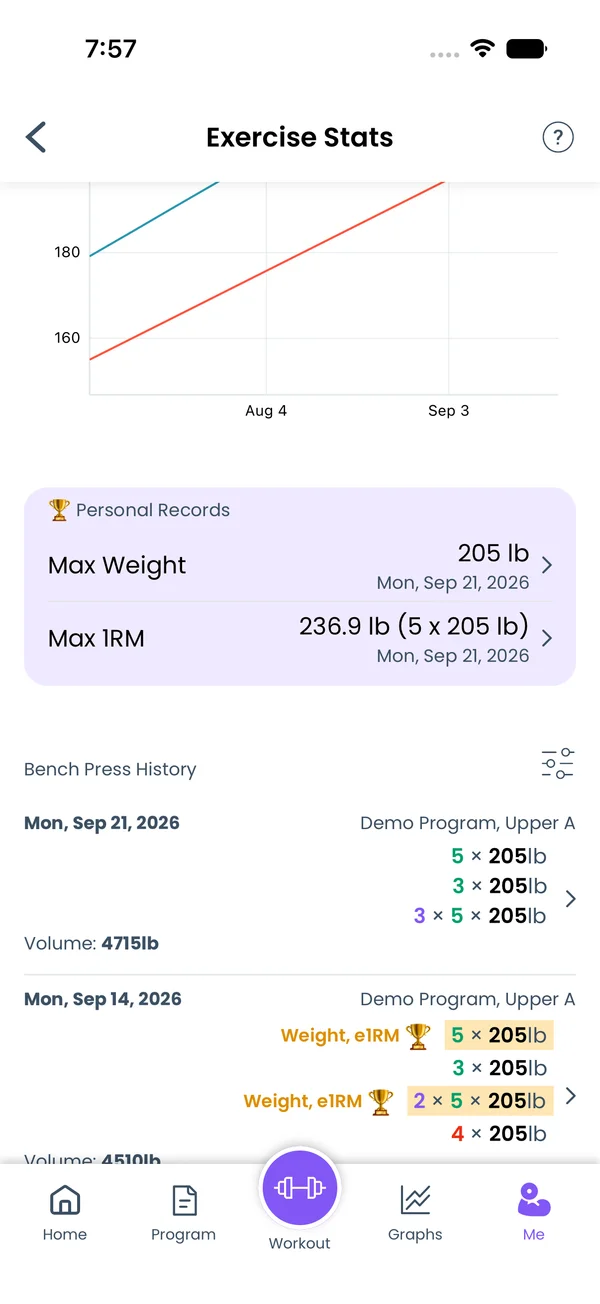\n\nEvery exercise also has its own **Exercise Stats** screen. Open it from **Me → Exercises** and tap the exercise, or tap the exercise name during a workout.\n\nThe screen shows the exercise graph with the e1RM line and program lines always on. Below the graph, the **Personal Records** card lists your **Max Weight** and **Max 1RM**, each with the date. The 1RM row also shows the set behind it, like `5 x 225lb`. Tap a record to open that workout. The exercise history follows below.\n\nWithout Premium, the graph on this screen is blurred and does not respond to touch. The personal records stay visible.","sizes":{"account/account-email-form":{"width":600,"height":1304},"account/account-forgot-password":{"width":600,"height":1304},"account/account-screen":{"width":600,"height":1304},"account/account-sign-in":{"width":600,"height":1304},"chatgpt-claude-and-ai/chatgpt-claude-and-ai-autofill":{"width":600,"height":1304},"api/api-key-created":{"width":600,"height":1304},"api/api-keys-empty":{"width":600,"height":1304},"api/api-me-row":{"width":600,"height":1304},"apple-watch/apple-watch-health-settings":{"width":600,"height":1304},"apple-watch/watch-apple-watch-amrap":{"width":416,"height":496},"apple-watch/watch-apple-watch-crown":{"width":416,"height":496},"apple-watch/watch-apple-watch-exercise":{"width":416,"height":496},"apple-watch/watch-apple-watch-get-ready":{"width":416,"height":496},"apple-watch/watch-apple-watch-home":{"width":416,"height":496},"apple-watch/watch-apple-watch-set-clock":{"width":416,"height":496},"apple-watch/watch-apple-watch-workout":{"width":416,"height":496},"built-in-programs/built-in-programs-import":{"width":600,"height":1304},"built-in-programs/built-in-programs-info":{"width":600,"height":1304},"built-in-programs/built-in-programs-library":{"width":600,"height":1304},"built-in-programs/built-in-programs-preview":{"width":600,"height":1304},"built-in-programs/built-in-programs-started":{"width":600,"height":1304},"changing-a-workout/changing-a-workout-adhoc":{"width":600,"height":1304},"changing-a-workout/changing-a-workout-adhoc-picker":{"width":600,"height":1304},"changing-a-workout/changing-a-workout-create-program-day":{"width":600,"height":1304},"changing-a-workout/changing-a-workout-edit-day":{"width":600,"height":1304},"changing-a-workout/changing-a-workout-edit-exercise":{"width":600,"height":1304},"changing-a-workout/changing-a-workout-next-workout":{"width":600,"height":1304},"changing-a-workout/changing-a-workout-pick-day":{"width":600,"height":1304},"changing-a-workout/changing-a-workout-program-day":{"width":600,"height":1304},"changing-a-workout/changing-a-workout-swap-adhoc":{"width":600,"height":1304},"changing-a-workout/changing-a-workout-swap-from-program":{"width":600,"height":1304},"changing-a-workout/changing-a-workout-swap-recent":{"width":600,"height":1304},"custom-exercises/custom-exercises-autofill":{"width":600,"height":1304},"custom-exercises/custom-exercises-clone-library":{"width":600,"height":1304},"custom-exercises/custom-exercises-cloned":{"width":600,"height":1304},"custom-exercises/custom-exercises-form":{"width":600,"height":1304},"custom-exercises/custom-exercises-hidden-group":{"width":600,"height":1304},"custom-exercises/custom-exercises-image-library":{"width":600,"height":1304},"custom-exercises/custom-exercises-image-source":{"width":600,"height":1304},"custom-exercises/custom-exercises-in-workout":{"width":600,"height":1304},"custom-exercises/custom-exercises-muscle-groups":{"width":600,"height":1304},"custom-exercises/custom-exercises-picker":{"width":600,"height":1304},"custom-exercises/custom-exercises-target-muscles":{"width":600,"height":1304},"equipment-and-gyms/equipment-and-gyms-barbell":{"width":600,"height":1304},"equipment-and-gyms/equipment-and-gyms-custom":{"width":600,"height":1304},"equipment-and-gyms/equipment-and-gyms-exercise":{"width":600,"height":1304},"equipment-and-gyms/equipment-and-gyms-fixed":{"width":600,"height":1304},"equipment-and-gyms/equipment-and-gyms-gyms":{"width":600,"height":1304},"equipment-and-gyms/equipment-and-gyms-hidden":{"width":600,"height":1304},"equipment-and-gyms/equipment-and-gyms-list":{"width":600,"height":1304},"exercise-library/exercise-library-calculator":{"width":600,"height":1304},"exercise-library/exercise-library-from-program":{"width":600,"height":1304},"exercise-library/exercise-library-list":{"width":600,"height":1304},"exercise-library/exercise-library-multi-add":{"width":600,"height":1304},"exercise-library/exercise-library-override-muscles":{"width":600,"height":1304},"exercise-library/exercise-library-picker":{"width":600,"height":1304},"exercise-library/exercise-library-prs":{"width":600,"height":1304},"exercise-library/exercise-library-search":{"width":600,"height":1304},"exercise-library/exercise-library-stats":{"width":600,"height":1304},"exercise-library/exercise-library-swap":{"width":600,"height":1304},"graphs/graphs-bodyweight":{"width":600,"height":1304},"graphs/graphs-choose":{"width":600,"height":1304},"graphs/graphs-exercise":{"width":600,"height":1304},"graphs/graphs-legend":{"width":600,"height":1304},"graphs/graphs-muscle-group":{"width":600,"height":1304},"graphs/graphs-personal-records":{"width":600,"height":1304},"graphs/graphs-settings":{"width":600,"height":1304},"health-sync/android-health-sync-measurements":{"width":600,"height":1339},"health-sync/android-health-sync-settings":{"width":600,"height":1339},"health-sync/android-health-sync-share":{"width":600,"height":1339},"health-sync/android-health-sync-sleep-nutrition":{"width":600,"height":1339},"health-sync/health-sync-measurements":{"width":600,"height":1304},"health-sync/health-sync-settings":{"width":600,"height":1304},"health-sync/health-sync-share":{"width":600,"height":1304},"health-sync/health-sync-sleep-nutrition":{"width":600,"height":1304},"import-export/import-export-export":{"width":600,"height":1304},"import-export/import-export-hevy":{"width":600,"height":1304},"import-export/import-export-import":{"width":600,"height":1304},"liftoscript/liftoscript-exercise-sheet":{"width":600,"height":1304},"liftoscript/liftoscript-full-program":{"width":600,"height":1304},"liftoscript/liftoscript-per-day":{"width":600,"height":1304},"liftoscript/liftoscript-playground":{"width":600,"height":1304},"lock-screen-and-notifications/android-lock-screen-and-notifications-live-update":{"width":600,"height":1339},"lock-screen-and-notifications/android-lock-screen-and-notifications-reminder":{"width":600,"height":1339},"lock-screen-and-notifications/android-lock-screen-and-notifications-sound":{"width":600,"height":1339},"lock-screen-and-notifications/lock-screen-and-notifications-dynamic-island":{"width":600,"height":1304},"lock-screen-and-notifications/lock-screen-and-notifications-live-activity":{"width":600,"height":1304},"lock-screen-and-notifications/lock-screen-and-notifications-reminder":{"width":600,"height":1304},"lock-screen-and-notifications/lock-screen-and-notifications-sound":{"width":600,"height":1304},"measurements/measurements-add":{"width":600,"height":1304},"measurements/measurements-bodyweight":{"width":600,"height":1304},"measurements/measurements-moving-average":{"width":600,"height":1304},"measurements/measurements-sleep-nutrition":{"width":600,"height":1304},"measurements/measurements-types":{"width":600,"height":1304},"first-run-and-settings/first-run-and-settings-appearance":{"width":600,"height":1304},"first-run-and-settings/first-run-and-settings-dark-mode":{"width":600,"height":1304},"first-run-and-settings/first-run-and-settings-equipment":{"width":600,"height":1304},"first-run-and-settings/first-run-and-settings-me":{"width":600,"height":1304},"first-run-and-settings/first-run-and-settings-units":{"width":600,"height":1304},"first-run-and-settings/first-run-and-settings-welcome":{"width":600,"height":1304},"playground/playground-completed":{"width":600,"height":1304},"playground/playground-day":{"width":600,"height":1304},"playground/playground-finished":{"width":600,"height":1304},"playground/playground-variables":{"width":600,"height":1304},"premium/premium-account":{"width":600,"height":1304},"premium/premium-feature-info":{"width":600,"height":1304},"premium/premium-plans":{"width":600,"height":1304},"program-editor/program-editor-create":{"width":600,"height":1304},"program-editor/program-editor-day-details":{"width":600,"height":1304},"program-editor/program-editor-exercise-sheet":{"width":600,"height":1304},"program-editor/program-editor-full-text":{"width":600,"height":1304},"program-editor/program-editor-grid":{"width":600,"height":1304},"program-editor/program-editor-perday-text":{"width":600,"height":1304},"program-editor/program-editor-ui-mode":{"width":600,"height":1304},"program-editor/program-editor-week-stats":{"width":600,"height":1304},"progressions/progressions-linear-settings":{"width":600,"height":1304},"progressions/progressions-preview":{"width":600,"height":1304},"progressions/progressions-state-variables":{"width":600,"height":1304},"progressions/progressions-suppressed":{"width":600,"height":1304},"rest-timer/rest-timer-collapsed":{"width":600,"height":1304},"rest-timer/rest-timer-dynamic-island":{"width":600,"height":1304},"rest-timer/rest-timer-expanded":{"width":600,"height":1304},"rest-timer/rest-timer-get-ready":{"width":600,"height":1304},"rest-timer/rest-timer-lock-screen":{"width":600,"height":1304},"rest-timer/rest-timer-settings":{"width":600,"height":1304},"rest-timer/rest-timer-sound":{"width":600,"height":1304},"rest-timer/watch-rest-timer":{"width":416,"height":496},"rest-timer/watch-rest-timer-exercise":{"width":416,"height":496},"set-types/set-types-amrap-popup":{"width":600,"height":1304},"set-types/set-types-per-side":{"width":600,"height":1304},"set-types/set-types-rpe-logged":{"width":600,"height":1304},"set-types/set-types-rpe-popup":{"width":600,"height":1304},"sharing-programs/sharing-programs-export-text":{"width":600,"height":1304},"sharing-programs/sharing-programs-image-preview":{"width":600,"height":1304},"sharing-programs/sharing-programs-image-settings":{"width":600,"height":1304},"sharing-programs/sharing-programs-import":{"width":600,"height":1304},"sharing-programs/sharing-programs-menu":{"width":600,"height":1304},"sharing-programs/sharing-programs-private-link":{"width":600,"height":1304},"sharing-programs/sharing-programs-public-link":{"width":600,"height":1304},"sharing-workouts/sharing-workouts-copied-text":{"width":600,"height":1304},"sharing-workouts/sharing-workouts-finish-screen":{"width":600,"height":1304},"sharing-workouts/sharing-workouts-profile-settings":{"width":600,"height":1304},"sharing-workouts/sharing-workouts-share-sheet":{"width":600,"height":1304},"sharing-workouts/sharing-workouts-story-preview":{"width":600,"height":1304},"supersets/supersets-liftoscript":{"width":600,"height":1304},"supersets/supersets-next-exercise":{"width":600,"height":1304},"supersets/supersets-picker":{"width":600,"height":1304},"supersets/supersets-program-editor":{"width":600,"height":1304},"supersets/supersets-timer":{"width":600,"height":1304},"supersets/supersets-workout":{"width":600,"height":1304},"sync-and-offline/sync-and-offline-account":{"width":600,"height":1304},"sync-and-offline/sync-and-offline-me-account":{"width":600,"height":1304},"sync-and-offline/sync-and-offline-sign-in":{"width":600,"height":1304},"timed-sets/timed-sets-count-up":{"width":600,"height":1304},"timed-sets/timed-sets-edit-time":{"width":600,"height":1304},"timed-sets/timed-sets-get-ready":{"width":600,"height":1304},"timed-sets/timed-sets-recorded":{"width":600,"height":1304},"timed-sets/timed-sets-running":{"width":600,"height":1304},"timed-sets/timed-sets-set-row":{"width":600,"height":1304},"timed-sets/timed-sets-timers":{"width":600,"height":1304},"week-insights/week-insights-details":{"width":600,"height":1304},"week-insights/week-insights-edit-muscle-groups":{"width":600,"height":1304},"week-insights/week-insights-exercises":{"width":600,"height":1304},"week-insights/week-insights-home":{"width":600,"height":1304},"week-insights/week-insights-muscle-groups":{"width":600,"height":1304},"week-insights/week-insights-settings":{"width":600,"height":1304},"workout-history/workout-history-change-date":{"width":600,"height":1304},"workout-history/workout-history-delete":{"width":600,"height":1304},"workout-history/workout-history-feed":{"width":600,"height":1304},"workout-history/workout-history-menu":{"width":600,"height":1304},"workout-history/workout-history-month-calendar":{"width":600,"height":1304},"workout-history/workout-history-note-on-card":{"width":600,"height":1304},"workout-history/workout-history-notes":{"width":600,"height":1304},"workout-history/workout-history-past-card":{"width":600,"height":1304},"workout-history/workout-history-past-workout":{"width":600,"height":1304},"workout-history/workout-history-week-insights":{"width":600,"height":1304},"workout-screen/workout-screen-e1rm":{"width":600,"height":1304},"workout-screen/workout-screen-edit-target":{"width":600,"height":1304},"workout-screen/workout-screen-exercise-menu":{"width":600,"height":1304},"workout-screen/workout-screen-exercise-notes":{"width":600,"height":1304},"workout-screen/workout-screen-history":{"width":600,"height":1304},"workout-screen/workout-screen-keypad":{"width":600,"height":1304},"workout-screen/workout-screen-next-set":{"width":600,"height":1304},"workout-screen/workout-screen-overview":{"width":600,"height":1304},"workout-screen/workout-screen-rounding":{"width":600,"height":1304},"workout-screen/workout-screen-summary":{"width":600,"height":1304}}}






