Run your workout from your wrist. Log sets with the Digital Crown, answer AMRAP and RPE prompts, run timed sets and see your heart rate.
What you need
The watch app comes with the iPhone app. It needs Premium. Without it, the watch shows Premium Required with a Recheck button.
Open Liftosaur on the phone once after pairing, or the watch shows Sync Required.
Start or continue a workout
The home screen shows a New Workout card with the day name and the program name. Tap Start. If you started the workout on the phone, the card says Ongoing Workout and the button says Continue. Starting a workout on the phone opens the watch app on its own.
The workout screen lists every exercise with one dot per set. The dots turn green, orange or red as you log sets. Tap the Total time line to pause or resume the workout.
Log a set
Tap an exercise to open it. Turn the crown, or swipe up and down, to move between exercises. Swipe left and right to move between sets. The header shows Set 2/7 and a dot per set. The Plates line shows what to load.
Tap the check mark to log the set as written. The watch moves to the next set on its own.
To change a number, tap the reps or the weight field. It gets a purple border, and the crown now turns that value. The weight field steps only through weights you can build from your equipment. The watch saves the change one second after you stop turning.
Past the last set there is an Add page that adds a set. The … button in the header opens Delete set. You cannot swap exercises or change the targets on the watch.
When every set is done, the watch shows All Sets Completed! with Finish Workout and Continue.
AMRAP, RPE and asked weight
A set written as 5+ opens a prompt after you tap the check mark. Tap Reps, turn the crown, then tap Done. The same prompt asks Weight (lb) for a ? weight, RPE in steps of 0.5 for an @8+ set, and any user-prompted state variable. A one-sided exercise asks Reps (left) and Reps (right). See Set Types for the syntax.
Rest timer
After a set, the rest timer sits at the top of the exercise screen and turns red once you are over. Tap it for -15, +15 and Delete. When the rest ends, the watch taps your wrist and plays a chime, unless the volume in Me → Settings is 0. See Rest Timer.
Timed sets
For a set like Plank / 3x1 60s|30s, the check mark becomes a play button. Tap it and a Get Ready ring counts down, 5 seconds by default. Tap the ring to start right away, or the X in the corner to close it.
Then the set clock runs, 0:12 of 1:00. At the target, the watch logs the set and starts the rest. Log & Stop logs the elapsed time early. Log & Keep logs it and lets the clock run on. A one-sided exercise runs Left and then Right, with Next side between them. The logged time shows on the Plates line. Tap it to edit or clear it. See Timed Sets for the syntax.
Heart rate
Starting a workout on the watch starts an Apple Health strength workout session. Your heart rate then shows under the clock on every workout screen, in beats per minute. It reads -- until the first reading arrives. If a reading never comes, tap the heart to start the session again. If it still shows --, check that Liftosaur may read heart rate: on the watch, open Settings → Privacy & Security → Health, and on the iPhone, open the Health app, then Sharing → Apps and Services → Liftosaur.
Finish the workout and Apple Health
Tap Finish on the workout screen. The Summary shows time, volume, sets, reps, the exercises, sets per muscle group and any personal records. Done returns to the home screen.
The workout goes to Apple Health when Sync Workouts is on in Me → Settings, under Sync → Apple Health. Turn on Confirm each workout sync? and the watch asks Sync to Apple Health? first. Finishing on the phone finishes on the watch too, and the workout is saved to Health only once.
Without the phone
The watch keeps its own copy of the program and the ongoing workout, so it works with the phone in the locker. When the phone is in reach, the watch sends the changes over, and the phone's Live Activity shows the set you just completed. When it is not, and you are signed in on the phone, the watch talks to the Liftosaur server directly.
A set you log on the phone shows up on the watch, and the watch jumps to the next set. A spinner in the top left corner means a sync is running. A red cloud means it failed. Sync on the home screen retries.
The complication
Add the Liftosaur complication to a watch face to open the app. The rectangular one shows Up Next or Ongoing with the program and day name. The corner and inline ones show the day name next to the dinosaur.
{"feature":{"id":"apple-watch","title":"Apple Watch","shortDescription":"Run your workout from your wrist. Log sets with the Digital Crown, answer AMRAP and RPE prompts, run timed sets and see your heart rate.","order":80,"category":"Workout","datePublished":"2026-09-27","dateModified":"2026-09-28","screenshots":["watch-apple-watch-exercise","watch-apple-watch-get-ready"]},"content":"## What you need\n\n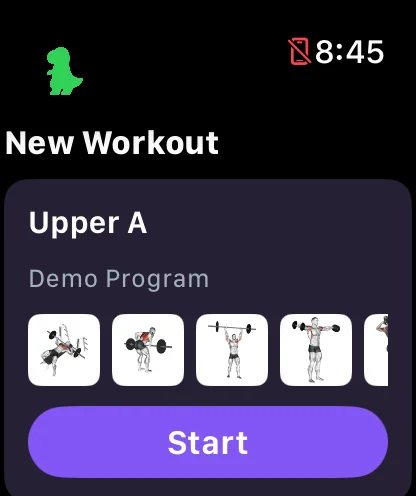\n\nThe watch app comes with the iPhone app. It needs Premium. Without it, the watch shows **Premium Required** with a **Recheck** button.\n\nOpen Liftosaur on the phone once after pairing, or the watch shows **Sync Required**.\n\n## Start or continue a workout\n\n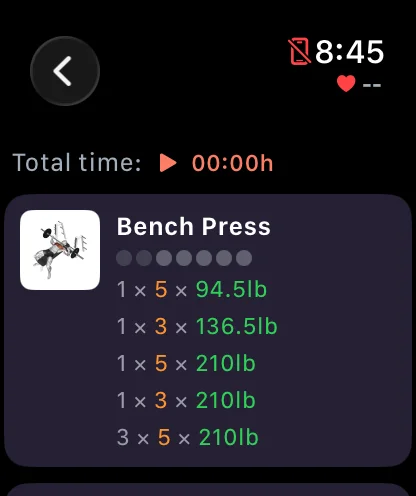\n\nThe home screen shows a **New Workout** card with the day name and the program name. Tap **Start**. If you started the workout on the phone, the card says **Ongoing Workout** and the button says **Continue**. Starting a workout on the phone opens the watch app on its own.\n\nThe workout screen lists every exercise with one dot per set. The dots turn green, orange or red as you log sets. Tap the **Total time** line to pause or resume the workout.\n\n## Log a set\n\n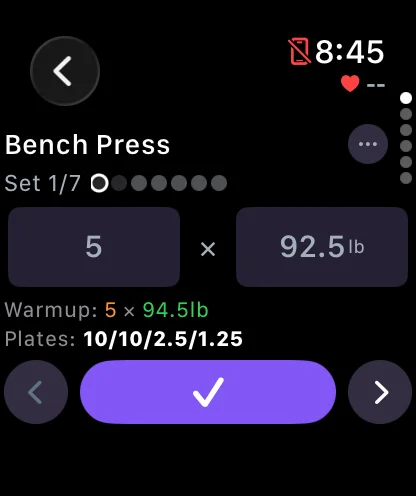 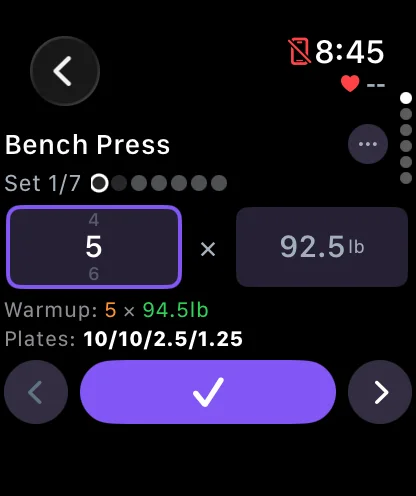\n\nTap an exercise to open it. Turn the crown, or swipe up and down, to move between exercises. Swipe left and right to move between sets. The header shows **Set 2/7** and a dot per set. The **Plates** line shows what to load.\n\nTap the check mark to log the set as written. The watch moves to the next set on its own.\n\nTo change a number, tap the reps or the weight field. It gets a purple border, and the crown now turns that value. The weight field steps only through weights you can build from your equipment. The watch saves the change one second after you stop turning.\n\nPast the last set there is an **Add** page that adds a set. The **…** button in the header opens **Delete set**. You cannot swap exercises or change the targets on the watch.\n\nWhen every set is done, the watch shows **All Sets Completed!** with **Finish Workout** and **Continue**.\n\n## AMRAP, RPE and asked weight\n\n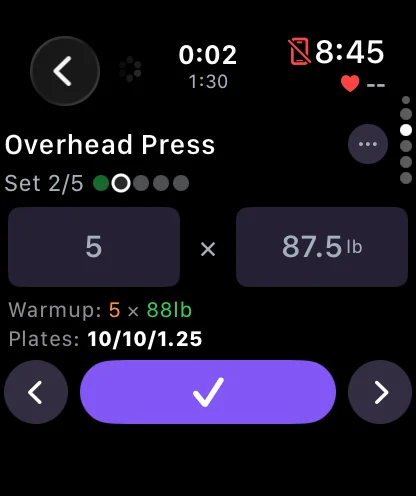\n\nA set written as `5+` opens a prompt after you tap the check mark. Tap **Reps**, turn the crown, then tap **Done**. The same prompt asks **Weight (lb)** for a `?` weight, **RPE** in steps of 0.5 for an `@8+` set, and any user-prompted state variable. A one-sided exercise asks **Reps (left)** and **Reps (right)**. See [Set Types](/features/set-types) for the syntax.\n\n## Rest timer\n\nAfter a set, the rest timer sits at the top of the exercise screen and turns red once you are over. Tap it for **-15**, **+15** and **Delete**. When the rest ends, the watch taps your wrist and plays a chime, unless the volume in **Me → Settings** is 0. See [Rest Timer](/features/rest-timer).\n\n## Timed sets\n\n 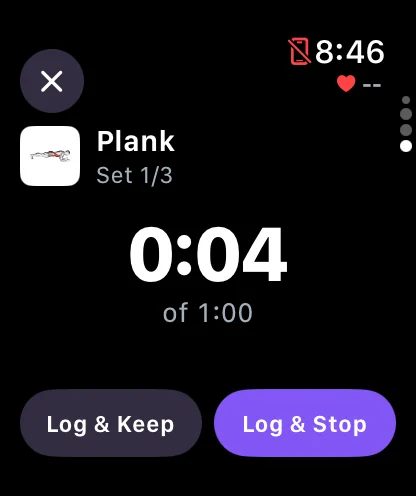\n\nFor a set like `Plank / 3x1 60s|30s`, the check mark becomes a play button. Tap it and a **Get Ready** ring counts down, 5 seconds by default. Tap the ring to start right away, or the **X** in the corner to close it.\n\nThen the set clock runs, `0:12 of 1:00`. At the target, the watch logs the set and starts the rest. **Log & Stop** logs the elapsed time early. **Log & Keep** logs it and lets the clock run on. A one-sided exercise runs **Left** and then **Right**, with **Next side** between them. The logged time shows on the Plates line. Tap it to edit or clear it. See [Timed Sets](/features/timed-sets) for the syntax.\n\n## Heart rate\n\nStarting a workout on the watch starts an Apple Health strength workout session. Your heart rate then shows under the clock on every workout screen, in beats per minute. It reads `--` until the first reading arrives. If a reading never comes, tap the heart to start the session again. If it still shows `--`, check that Liftosaur may read heart rate: on the watch, open **Settings → Privacy & Security → Health**, and on the iPhone, open the **Health** app, then **Sharing → Apps and Services → Liftosaur**.\n\n## Finish the workout and Apple Health\n\n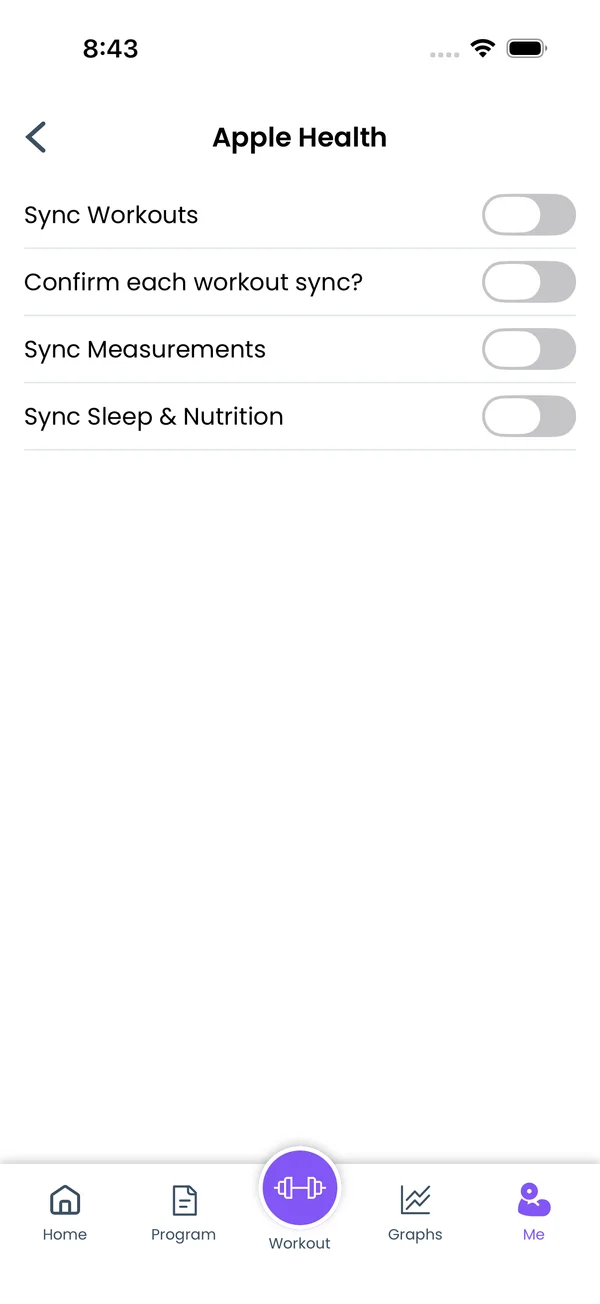\n\nTap **Finish** on the workout screen. The **Summary** shows time, volume, sets, reps, the exercises, sets per muscle group and any personal records. **Done** returns to the home screen.\n\nThe workout goes to Apple Health when **Sync Workouts** is on in **Me → Settings**, under **Sync → Apple Health**. Turn on **Confirm each workout sync?** and the watch asks **Sync to Apple Health?** first. Finishing on the phone finishes on the watch too, and the workout is saved to Health only once.\n\n## Without the phone\n\nThe watch keeps its own copy of the program and the ongoing workout, so it works with the phone in the locker. When the phone is in reach, the watch sends the changes over, and the phone's Live Activity shows the set you just completed. When it is not, and you are signed in on the phone, the watch talks to the Liftosaur server directly.\n\nA set you log on the phone shows up on the watch, and the watch jumps to the next set. A spinner in the top left corner means a sync is running. A red cloud means it failed. **Sync** on the home screen retries.\n\n## The complication\n\nAdd the Liftosaur complication to a watch face to open the app. The rectangular one shows **Up Next** or **Ongoing** with the program and day name. The corner and inline ones show the day name next to the dinosaur.","sizes":{"account/account-email-form":{"width":600,"height":1304},"account/account-forgot-password":{"width":600,"height":1304},"account/account-screen":{"width":600,"height":1304},"account/account-sign-in":{"width":600,"height":1304},"chatgpt-claude-and-ai/chatgpt-claude-and-ai-autofill":{"width":600,"height":1304},"api/api-key-created":{"width":600,"height":1304},"api/api-keys-empty":{"width":600,"height":1304},"api/api-me-row":{"width":600,"height":1304},"apple-watch/apple-watch-health-settings":{"width":600,"height":1304},"apple-watch/watch-apple-watch-amrap":{"width":416,"height":496},"apple-watch/watch-apple-watch-crown":{"width":416,"height":496},"apple-watch/watch-apple-watch-exercise":{"width":416,"height":496},"apple-watch/watch-apple-watch-get-ready":{"width":416,"height":496},"apple-watch/watch-apple-watch-home":{"width":416,"height":496},"apple-watch/watch-apple-watch-set-clock":{"width":416,"height":496},"apple-watch/watch-apple-watch-workout":{"width":416,"height":496},"built-in-programs/built-in-programs-import":{"width":600,"height":1304},"built-in-programs/built-in-programs-info":{"width":600,"height":1304},"built-in-programs/built-in-programs-library":{"width":600,"height":1304},"built-in-programs/built-in-programs-preview":{"width":600,"height":1304},"built-in-programs/built-in-programs-started":{"width":600,"height":1304},"changing-a-workout/changing-a-workout-adhoc":{"width":600,"height":1304},"changing-a-workout/changing-a-workout-adhoc-picker":{"width":600,"height":1304},"changing-a-workout/changing-a-workout-create-program-day":{"width":600,"height":1304},"changing-a-workout/changing-a-workout-edit-day":{"width":600,"height":1304},"changing-a-workout/changing-a-workout-edit-exercise":{"width":600,"height":1304},"changing-a-workout/changing-a-workout-next-workout":{"width":600,"height":1304},"changing-a-workout/changing-a-workout-pick-day":{"width":600,"height":1304},"changing-a-workout/changing-a-workout-program-day":{"width":600,"height":1304},"changing-a-workout/changing-a-workout-swap-adhoc":{"width":600,"height":1304},"changing-a-workout/changing-a-workout-swap-from-program":{"width":600,"height":1304},"changing-a-workout/changing-a-workout-swap-recent":{"width":600,"height":1304},"custom-exercises/custom-exercises-autofill":{"width":600,"height":1304},"custom-exercises/custom-exercises-clone-library":{"width":600,"height":1304},"custom-exercises/custom-exercises-cloned":{"width":600,"height":1304},"custom-exercises/custom-exercises-form":{"width":600,"height":1304},"custom-exercises/custom-exercises-hidden-group":{"width":600,"height":1304},"custom-exercises/custom-exercises-image-library":{"width":600,"height":1304},"custom-exercises/custom-exercises-image-source":{"width":600,"height":1304},"custom-exercises/custom-exercises-in-workout":{"width":600,"height":1304},"custom-exercises/custom-exercises-muscle-groups":{"width":600,"height":1304},"custom-exercises/custom-exercises-picker":{"width":600,"height":1304},"custom-exercises/custom-exercises-target-muscles":{"width":600,"height":1304},"equipment-and-gyms/equipment-and-gyms-barbell":{"width":600,"height":1304},"equipment-and-gyms/equipment-and-gyms-custom":{"width":600,"height":1304},"equipment-and-gyms/equipment-and-gyms-exercise":{"width":600,"height":1304},"equipment-and-gyms/equipment-and-gyms-fixed":{"width":600,"height":1304},"equipment-and-gyms/equipment-and-gyms-gyms":{"width":600,"height":1304},"equipment-and-gyms/equipment-and-gyms-hidden":{"width":600,"height":1304},"equipment-and-gyms/equipment-and-gyms-list":{"width":600,"height":1304},"exercise-library/exercise-library-calculator":{"width":600,"height":1304},"exercise-library/exercise-library-from-program":{"width":600,"height":1304},"exercise-library/exercise-library-list":{"width":600,"height":1304},"exercise-library/exercise-library-multi-add":{"width":600,"height":1304},"exercise-library/exercise-library-override-muscles":{"width":600,"height":1304},"exercise-library/exercise-library-picker":{"width":600,"height":1304},"exercise-library/exercise-library-prs":{"width":600,"height":1304},"exercise-library/exercise-library-search":{"width":600,"height":1304},"exercise-library/exercise-library-stats":{"width":600,"height":1304},"exercise-library/exercise-library-swap":{"width":600,"height":1304},"graphs/graphs-bodyweight":{"width":600,"height":1304},"graphs/graphs-choose":{"width":600,"height":1304},"graphs/graphs-exercise":{"width":600,"height":1304},"graphs/graphs-legend":{"width":600,"height":1304},"graphs/graphs-muscle-group":{"width":600,"height":1304},"graphs/graphs-personal-records":{"width":600,"height":1304},"graphs/graphs-settings":{"width":600,"height":1304},"health-sync/android-health-sync-measurements":{"width":600,"height":1339},"health-sync/android-health-sync-settings":{"width":600,"height":1339},"health-sync/android-health-sync-share":{"width":600,"height":1339},"health-sync/android-health-sync-sleep-nutrition":{"width":600,"height":1339},"health-sync/health-sync-measurements":{"width":600,"height":1304},"health-sync/health-sync-settings":{"width":600,"height":1304},"health-sync/health-sync-share":{"width":600,"height":1304},"health-sync/health-sync-sleep-nutrition":{"width":600,"height":1304},"import-export/import-export-export":{"width":600,"height":1304},"import-export/import-export-hevy":{"width":600,"height":1304},"import-export/import-export-import":{"width":600,"height":1304},"liftoscript/liftoscript-exercise-sheet":{"width":600,"height":1304},"liftoscript/liftoscript-full-program":{"width":600,"height":1304},"liftoscript/liftoscript-per-day":{"width":600,"height":1304},"liftoscript/liftoscript-playground":{"width":600,"height":1304},"lock-screen-and-notifications/android-lock-screen-and-notifications-live-update":{"width":600,"height":1339},"lock-screen-and-notifications/android-lock-screen-and-notifications-reminder":{"width":600,"height":1339},"lock-screen-and-notifications/android-lock-screen-and-notifications-sound":{"width":600,"height":1339},"lock-screen-and-notifications/lock-screen-and-notifications-dynamic-island":{"width":600,"height":1304},"lock-screen-and-notifications/lock-screen-and-notifications-live-activity":{"width":600,"height":1304},"lock-screen-and-notifications/lock-screen-and-notifications-reminder":{"width":600,"height":1304},"lock-screen-and-notifications/lock-screen-and-notifications-sound":{"width":600,"height":1304},"measurements/measurements-add":{"width":600,"height":1304},"measurements/measurements-bodyweight":{"width":600,"height":1304},"measurements/measurements-moving-average":{"width":600,"height":1304},"measurements/measurements-sleep-nutrition":{"width":600,"height":1304},"measurements/measurements-types":{"width":600,"height":1304},"first-run-and-settings/first-run-and-settings-appearance":{"width":600,"height":1304},"first-run-and-settings/first-run-and-settings-dark-mode":{"width":600,"height":1304},"first-run-and-settings/first-run-and-settings-equipment":{"width":600,"height":1304},"first-run-and-settings/first-run-and-settings-me":{"width":600,"height":1304},"first-run-and-settings/first-run-and-settings-units":{"width":600,"height":1304},"first-run-and-settings/first-run-and-settings-welcome":{"width":600,"height":1304},"playground/playground-completed":{"width":600,"height":1304},"playground/playground-day":{"width":600,"height":1304},"playground/playground-finished":{"width":600,"height":1304},"playground/playground-variables":{"width":600,"height":1304},"premium/premium-account":{"width":600,"height":1304},"premium/premium-feature-info":{"width":600,"height":1304},"premium/premium-plans":{"width":600,"height":1304},"program-editor/program-editor-create":{"width":600,"height":1304},"program-editor/program-editor-day-details":{"width":600,"height":1304},"program-editor/program-editor-exercise-sheet":{"width":600,"height":1304},"program-editor/program-editor-full-text":{"width":600,"height":1304},"program-editor/program-editor-grid":{"width":600,"height":1304},"program-editor/program-editor-perday-text":{"width":600,"height":1304},"program-editor/program-editor-ui-mode":{"width":600,"height":1304},"program-editor/program-editor-week-stats":{"width":600,"height":1304},"progressions/progressions-linear-settings":{"width":600,"height":1304},"progressions/progressions-preview":{"width":600,"height":1304},"progressions/progressions-state-variables":{"width":600,"height":1304},"progressions/progressions-suppressed":{"width":600,"height":1304},"rest-timer/rest-timer-collapsed":{"width":600,"height":1304},"rest-timer/rest-timer-dynamic-island":{"width":600,"height":1304},"rest-timer/rest-timer-expanded":{"width":600,"height":1304},"rest-timer/rest-timer-get-ready":{"width":600,"height":1304},"rest-timer/rest-timer-lock-screen":{"width":600,"height":1304},"rest-timer/rest-timer-settings":{"width":600,"height":1304},"rest-timer/rest-timer-sound":{"width":600,"height":1304},"rest-timer/watch-rest-timer":{"width":416,"height":496},"rest-timer/watch-rest-timer-exercise":{"width":416,"height":496},"set-types/set-types-amrap-popup":{"width":600,"height":1304},"set-types/set-types-per-side":{"width":600,"height":1304},"set-types/set-types-rpe-logged":{"width":600,"height":1304},"set-types/set-types-rpe-popup":{"width":600,"height":1304},"sharing-programs/sharing-programs-export-text":{"width":600,"height":1304},"sharing-programs/sharing-programs-image-preview":{"width":600,"height":1304},"sharing-programs/sharing-programs-image-settings":{"width":600,"height":1304},"sharing-programs/sharing-programs-import":{"width":600,"height":1304},"sharing-programs/sharing-programs-menu":{"width":600,"height":1304},"sharing-programs/sharing-programs-private-link":{"width":600,"height":1304},"sharing-programs/sharing-programs-public-link":{"width":600,"height":1304},"sharing-workouts/sharing-workouts-copied-text":{"width":600,"height":1304},"sharing-workouts/sharing-workouts-finish-screen":{"width":600,"height":1304},"sharing-workouts/sharing-workouts-profile-settings":{"width":600,"height":1304},"sharing-workouts/sharing-workouts-share-sheet":{"width":600,"height":1304},"sharing-workouts/sharing-workouts-story-preview":{"width":600,"height":1304},"supersets/supersets-liftoscript":{"width":600,"height":1304},"supersets/supersets-next-exercise":{"width":600,"height":1304},"supersets/supersets-picker":{"width":600,"height":1304},"supersets/supersets-program-editor":{"width":600,"height":1304},"supersets/supersets-timer":{"width":600,"height":1304},"supersets/supersets-workout":{"width":600,"height":1304},"sync-and-offline/sync-and-offline-account":{"width":600,"height":1304},"sync-and-offline/sync-and-offline-me-account":{"width":600,"height":1304},"sync-and-offline/sync-and-offline-sign-in":{"width":600,"height":1304},"timed-sets/timed-sets-count-up":{"width":600,"height":1304},"timed-sets/timed-sets-edit-time":{"width":600,"height":1304},"timed-sets/timed-sets-get-ready":{"width":600,"height":1304},"timed-sets/timed-sets-recorded":{"width":600,"height":1304},"timed-sets/timed-sets-running":{"width":600,"height":1304},"timed-sets/timed-sets-set-row":{"width":600,"height":1304},"timed-sets/timed-sets-timers":{"width":600,"height":1304},"week-insights/week-insights-details":{"width":600,"height":1304},"week-insights/week-insights-edit-muscle-groups":{"width":600,"height":1304},"week-insights/week-insights-exercises":{"width":600,"height":1304},"week-insights/week-insights-home":{"width":600,"height":1304},"week-insights/week-insights-muscle-groups":{"width":600,"height":1304},"week-insights/week-insights-settings":{"width":600,"height":1304},"workout-history/workout-history-change-date":{"width":600,"height":1304},"workout-history/workout-history-delete":{"width":600,"height":1304},"workout-history/workout-history-feed":{"width":600,"height":1304},"workout-history/workout-history-menu":{"width":600,"height":1304},"workout-history/workout-history-month-calendar":{"width":600,"height":1304},"workout-history/workout-history-note-on-card":{"width":600,"height":1304},"workout-history/workout-history-notes":{"width":600,"height":1304},"workout-history/workout-history-past-card":{"width":600,"height":1304},"workout-history/workout-history-past-workout":{"width":600,"height":1304},"workout-history/workout-history-week-insights":{"width":600,"height":1304},"workout-screen/workout-screen-e1rm":{"width":600,"height":1304},"workout-screen/workout-screen-edit-target":{"width":600,"height":1304},"workout-screen/workout-screen-exercise-menu":{"width":600,"height":1304},"workout-screen/workout-screen-exercise-notes":{"width":600,"height":1304},"workout-screen/workout-screen-history":{"width":600,"height":1304},"workout-screen/workout-screen-keypad":{"width":600,"height":1304},"workout-screen/workout-screen-next-set":{"width":600,"height":1304},"workout-screen/workout-screen-overview":{"width":600,"height":1304},"workout-screen/workout-screen-rounding":{"width":600,"height":1304},"workout-screen/workout-screen-summary":{"width":600,"height":1304}}}







